You do not need to know editing terminology before you begin. You need a Vidmoat account, an internet connection, headphones if you have them, and a willingness to watch your work twice. A laptop gives you more room; a phone can complete the same core assignments. Keep your app or browser current, and check that each upload and save has finished before leaving.
This course is for creators making reviews, podcast clips, social videos, tutorials and small-business content. It begins with a ten-second sequence and builds towards a 30 to 60 second portfolio video. You will learn to give useful direction to an AI agent, recognise when its result needs help and make the final decisions yourself.
Work through the lessons in order the first time. Read the explanation, follow the steps in Vidmoat, try the exercise and answer the question before opening the feedback. The prompts are starting points: replace the source descriptions and instructions with details that match your project. Do not paste a prompt that refers to a file you have not uploaded.
Allow about 16 to 20 hours including reading, exercises, the four project studios and the capstone. This is a planning estimate, not recorded lecture duration. Filming additional material or exploring generation will take longer. You can study in short sessions: three lessons and one review each week gives you a ten-week route; two modules per week gives you a five-week route.
The core course uses your own material and the included original illustrations and audio. Paid generation, stock media, advanced tools and higher-resolution exports are optional. AI actions and exports can consume your account allowance. Read the cost or entitlement notice before starting a job. A branded or lower-resolution learning export is acceptable. No purchase beyond the access you choose is required by the assessment.
The web and phone interfaces may arrange controls differently. Follow the function and label, not a fixed screen coordinate. This edition was prepared against Vidmoat product sources in September 2026. If a described control is unavailable, use the stated manual alternative and check the current in-product help. Work privately during the course; publishing is a separate choice.
What you will learn
Write a brief that names an audience, message, source material and constraints.
Import footage and distinguish source files, timeline clips and references.
Create a rough cut while preserving meaning, natural speech and useful evidence.
Correct captions and build a readable text hierarchy for a small screen.
Balance speech, music and designed sound, and verify audio or lyric estimates.
Use framing, keyframes and colour to support the story rather than distract.
Choose optional generated media and check character or product continuity.
Export and review a finished video, diagnose failures and give useful feedback.
THE LEARNING PATH
Your course curriculum
01
Start with a video you can finish
Create a project, recognise the main editing areas and make a first short sequence.
Read here, print the workbook or adapt the editable manuscript. Interactive screenshot demonstrations and ten AI-narrated video companions are included.
Write a brief that gives your first video a clear purpose.
Imagine someone watching your video while waiting for a train. They have no idea who you are. What would make the next thirty seconds useful to them? That question is a better starting point than choosing a transition.
For our main project, you will review a desk lamp you already own. The viewer wants to know whether it would make their desk easier to use. Your job is to show one useful feature, one limitation and a verdict. You do not need a studio, a perfect voice or a new purchase. A mug, keyboard or notebook works just as well.
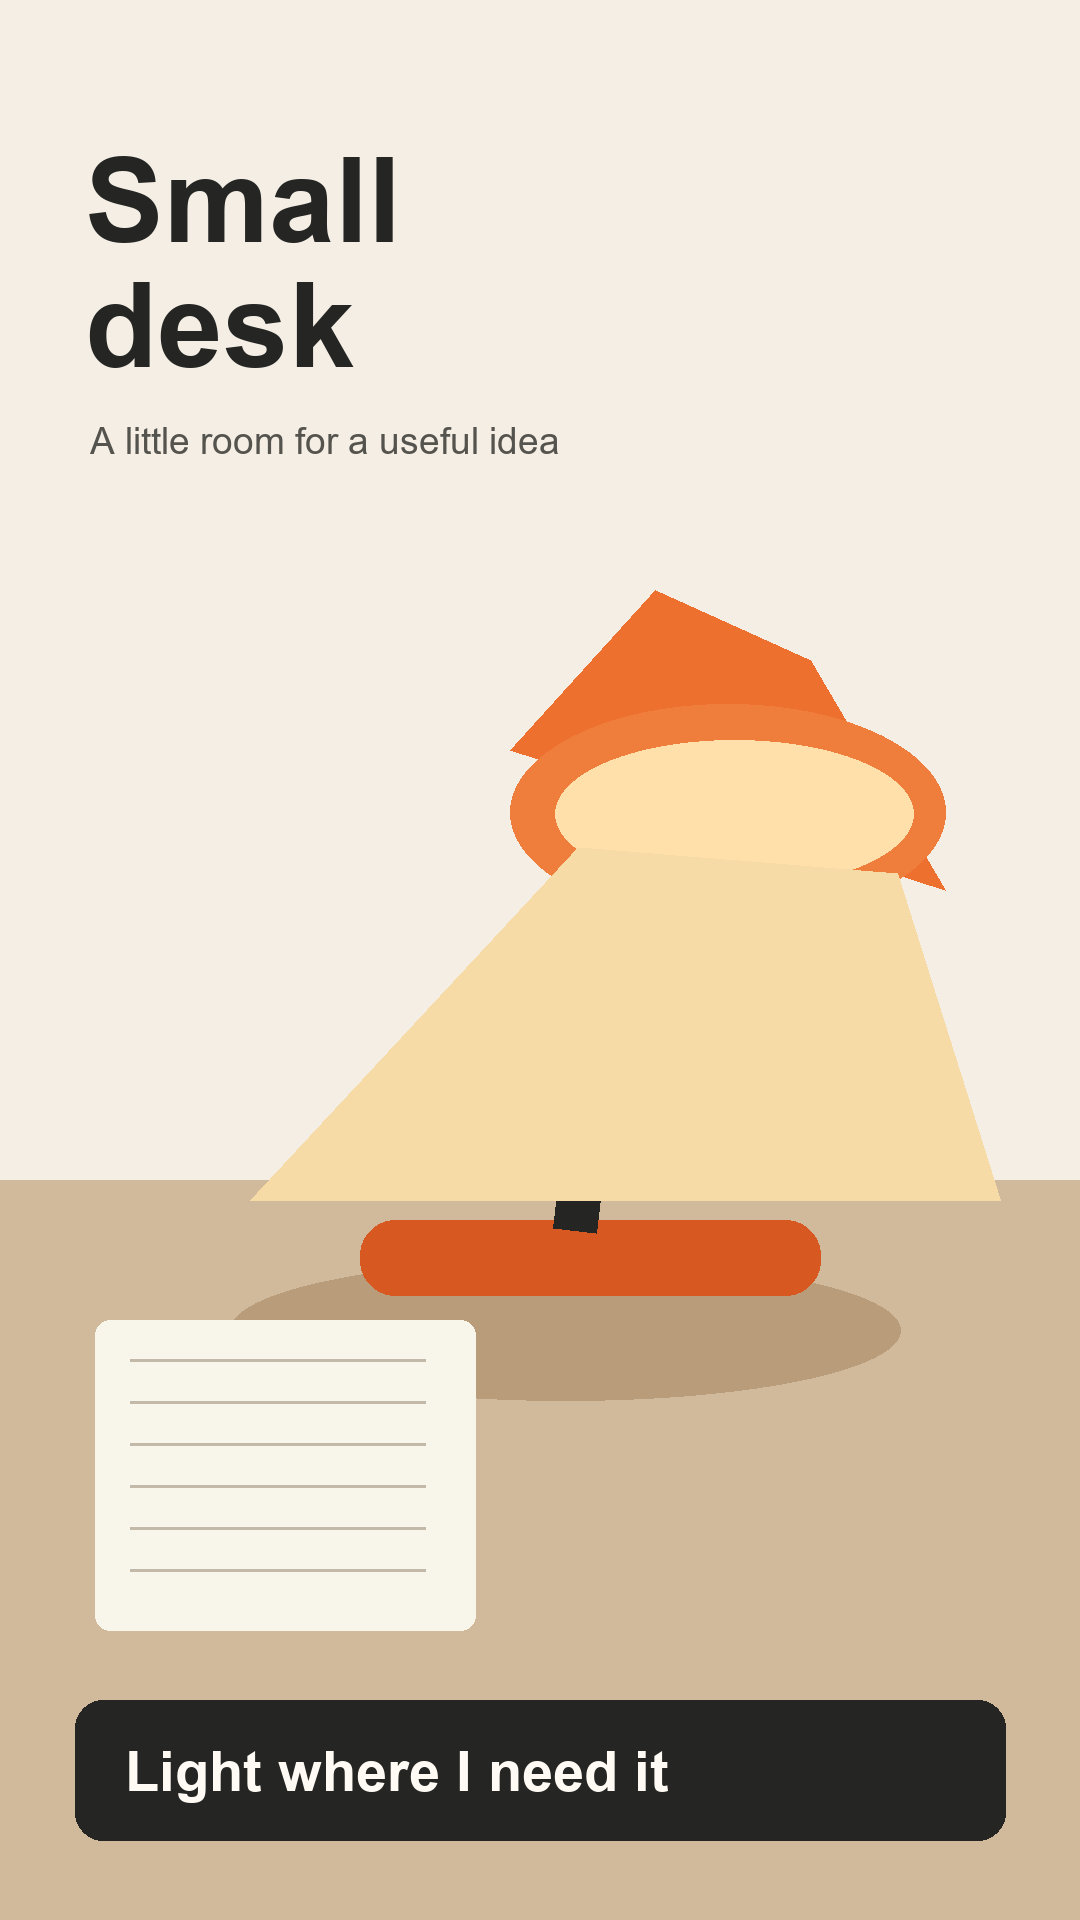
Vidmoat gives you an AI agent and an editable timeline. The agent can help assemble the first version; you decide whether it tells the truth and feels right. Generating new media is optional throughout the core course. Start with material you own, and use the included original lamp illustrations if you cannot film today. Those illustrations represent an imaginary product, so label the result as a concept demonstration rather than a real review.
SEE IT IN VIDMOAT · INTERACTIVE WALKTHROUGH
Work one panel at a time on your phone
Real editor screenshots · September 2026 · Select a step, then tap the image to zoom.
Phone browser view · 1 / 3
Bring in the source
Use Media in the bottom navigation to open the library. Upload the practice image, then add it to the timeline.
Look for this
Switch panels when the preview or controls need more space.
Phone browser view · 2 / 3
Inspect the selected clip
Select the clip, then use Properties to reach the inspector. The controls shown depend on what you selected.
Look for this
If the wrong properties appear, check the selected clip before changing anything.
Phone browser view · 3 / 3
Return to the picture
Close the panel to check the preview. Use the clip actions below the preview for trim and split tasks.
Look for this
Make small edits, then review with the controls out of the way.
Step 1 of 3
Follow along in Vidmoat
Choose a single viewer: for example, someone working at a small desk.
Write the question your video answers in one sentence.
Choose a 30-second target and a vertical 9:16 frame for this first exercise.
List three things you can actually show. Remove claims you cannot demonstrate.
Save the brief in your workbook before opening the editor.
A prompt you can adapt
I am making a 30-second vertical review for someone with a small desk. Help me plan a useful feature, an honest limitation and a verdict. Use only facts I provide. Do not edit or generate media yet.
Your turn
Write a brief for your own object. Finish: “After watching, my viewer will be able to decide whether…” Then write one claim you will deliberately avoid because you have not tested it.
What a successful attempt looks like
A good brief names a viewer, a question, a length and evidence. Example: “Show a student whether this lamp lights a notebook without taking much desk space.”
A common trap
“Make a viral video for everyone” gives the agent neither an audience nor a decision to support.
Saved in this browser only. Download your notes from the course menu to keep a copy.
Upload an asset, place it on the timeline and check that the project has saved.
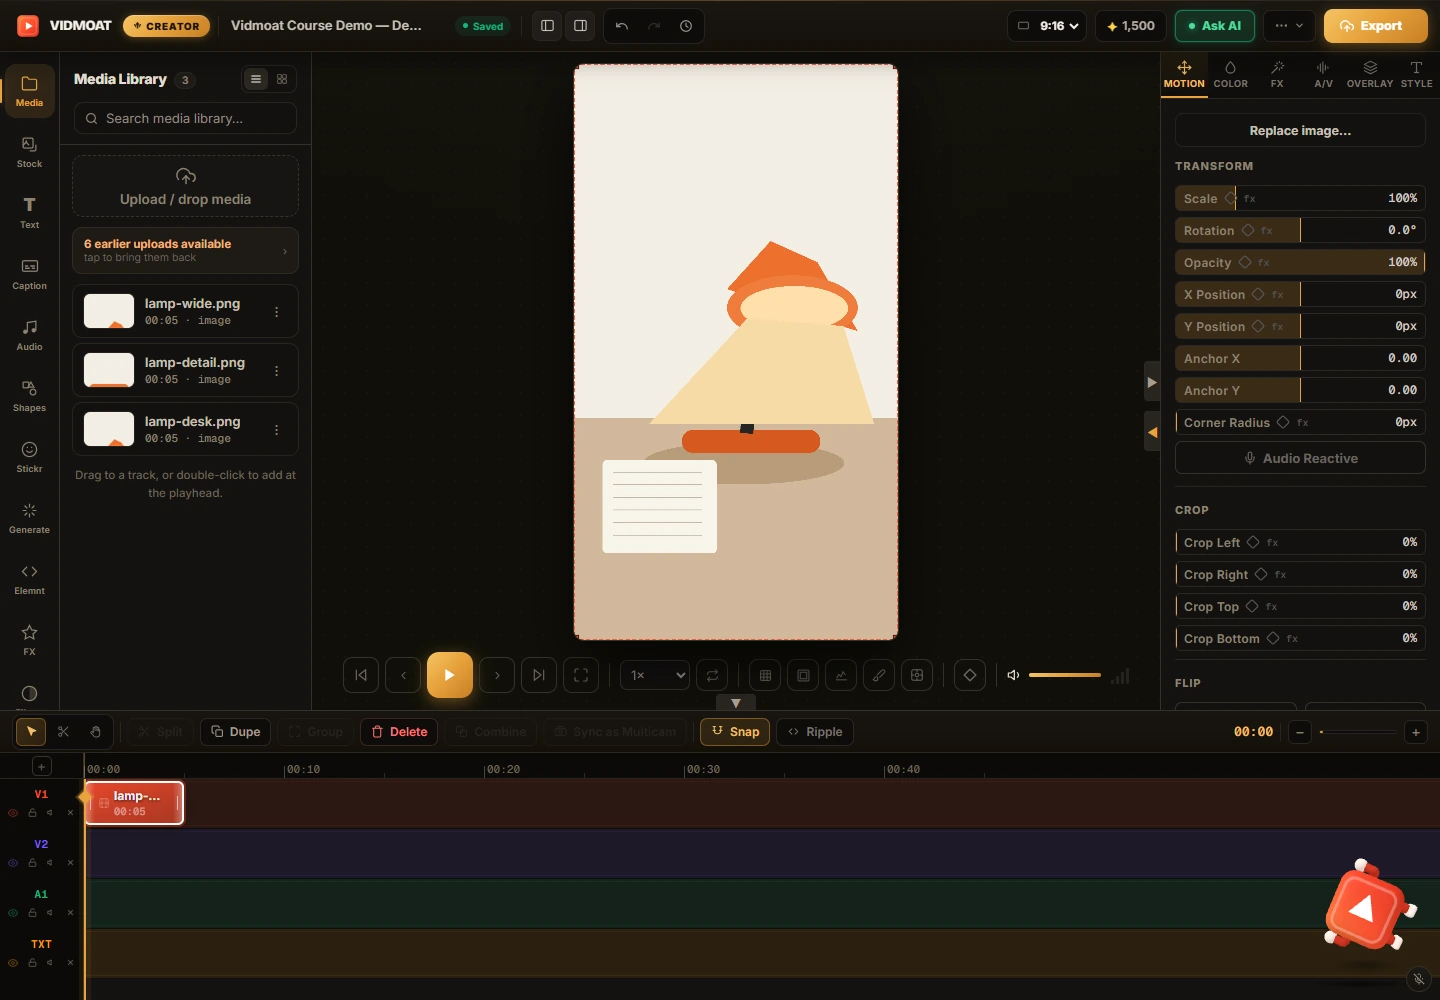
There are four places to recognise first. The media library holds your source files. The preview shows the current picture. The timeline decides what plays and when. The Inspector or Properties area changes the selected item. The AI chat is another way to work on that same project.
An uploaded file and a timeline clip are different things. A file can sit in your library without appearing in the video. A timeline clip points to part of that file. Trimming the clip changes the edit; it does not rewrite the original recording. This is why one long recording can provide several short clips.
On a wider screen, several areas can be visible together. On a phone, you switch between them. Follow the names and the job each area does rather than memorising its exact position. The current app may call an area Media, Media Library, AI, or Agent. Before continuing, confirm that the source upload has completed and the project is saved. A thumbnail alone is not proof that a file reached cloud storage.
Source library
→
Timeline clips
→
Reviewed export
Concept map: a source becomes part of the video when you place a clip on the timeline.
SEE IT IN VIDMOAT · INTERACTIVE WALKTHROUGH
From a file to your first timeline clip
Real editor screenshots · September 2026 · Select a step, then tap the image to zoom.
Actual editor capture; cropped where useful · 1 / 3
Start in the Media library
Choose Upload / drop media and select the three lamp images from the practice pack. A source in the library is available to use; it is not yet part of the finished video.
Look for this
Find the upload area, then the three source cards.
Actual editor capture; cropped where useful · 2 / 3
Place a source on the timeline
Double-click lamp-wide.png in the library. In this captured example, it becomes a five-second clip on V1. Select the clip before changing its properties.
Look for this
Look for the outlined clip on V1. The ruler above it is time.
Actual editor capture; cropped where useful · 3 / 3
Read the whole workspace
The library is on the left, the picture in the middle, and the selected clip’s Motion controls on the right. The timeline below decides what appears and when.
Look for this
Select your own clip and check that the inspector follows your selection.
Step 1 of 3
Follow along in Vidmoat
Sign in to Vidmoat and create a project named “Course 01 First edit”.
Use Add footage or open Media Library and choose Upload. Select your recording, or resources/lamp-wide.png.
Wait for upload progress to finish. Resolve any Retry message before leaving.
Add the library item to the timeline. On web, drag it in or use the item action; on phone, tap the item and its add action.
Play and pause the preview. Select the clip and find its properties. Wait for the saved state.
A prompt you can adapt
Check the media in this project. Tell me which files are available and which clips are already on the timeline. Do not change anything yet.
Your turn
Add one source and make it visible for five seconds. Switch from the timeline to chat and back. Find the source again in the library.
What a successful attempt looks like
You can explain the difference between the source file and the clip, and see the expected picture during playback.
A common trap
Style reference is guidance for the agent, not the normal footage-upload button. An empty timeline stays empty if you only attach a reference.
Saved in this browser only. Download your notes from the course menu to keep a copy.
Assemble a simple beginning, detail and ending without extra effects.
Your first finished edit should be small enough that you can watch it several times. Use three shots: the object in context, a useful detail, and an ending. The included lamp-wide, lamp-detail and lamp-desk illustrations make a complete practice set. They are intentionally simple so that you can focus on the timeline.
Set the project shape before spending time on text placement. A vertical frame is tall and narrow; a landscape frame is wide. Filling a frame can crop the sides of a source. Fitting the whole source may leave space around it. Neither is automatically wrong. Choose based on what the viewer must see.
For this exercise, use cuts rather than transitions. A cut immediately changes from one image to the next. Notice how the sequence already feels purposeful when the shots answer related questions. Later lessons add captions, music and motion. First, make sure a viewer can understand the object and the point without them.
SEE IT IN VIDMOAT · INTERACTIVE WALKTHROUGH
From a file to your first timeline clip
Real editor screenshots · September 2026 · Select a step, then tap the image to zoom.
Actual editor capture; cropped where useful · 1 / 3
Start in the Media library
Choose Upload / drop media and select the three lamp images from the practice pack. A source in the library is available to use; it is not yet part of the finished video.
Look for this
Find the upload area, then the three source cards.
Actual editor capture; cropped where useful · 2 / 3
Place a source on the timeline
Double-click lamp-wide.png in the library. In this captured example, it becomes a five-second clip on V1. Select the clip before changing its properties.
Look for this
Look for the outlined clip on V1. The ruler above it is time.
Actual editor capture; cropped where useful · 3 / 3
Read the whole workspace
The library is on the left, the picture in the middle, and the selected clip’s Motion controls on the right. The timeline below decides what appears and when.
Look for this
Select your own clip and check that the inspector follows your selection.
Step 1 of 3
Follow along in Vidmoat
In Project Settings, choose 9:16. Use the resolution available on your account.
Place the three practice images in order on one visual track.
Set their durations to 3 seconds, 4 seconds and 3 seconds. Put each directly after the previous one.
Add an ending title: “A little light for your desk”. Keep it clear of the lamp.
Play from zero to ten seconds. Check for blank gaps and accidental overlaps.
A prompt you can adapt
Use these three uploaded lamp illustrations to make a 10-second vertical concept sequence. Show wide for 3 seconds, detail for 4, desk for 3. Add the title “A little light for your desk” in the final shot. Use straight cuts and no new generated assets.
Your turn
Make the same sequence yourself or with the agent, then shorten the middle shot by one second and watch the effect. Restore the version you prefer.
What a successful attempt looks like
The sequence lasts approximately ten seconds, has no blank gap, and the title is readable on a phone-sized preview.
A common trap
Changing an image duration can leave space before the next clip. Inspect the join rather than assuming the timeline closed it.
Saved in this browser only. Download your notes from the course menu to keep a copy.
Ask for an edit with a purpose, constraints and an observable result.
“Make it engaging” is a feeling. An editor still needs to know what would produce that feeling. For a review, it might mean starting with the verdict, showing the feature while you mention it, and removing the time spent sitting down. For a calm tutorial, the same request might mean longer holds and fewer distractions.
A useful brief contains the audience, the message, the available sources, the target length and the boundaries. Boundaries protect what matters: keep the full warning, do not invent a price, preserve the speaker’s meaning, or use only uploaded music. Add one or two style choices, not a shopping list of effects.
Give the agent a manageable first pass. Ask for structure before polishing every caption. When the first pass is ready, play it. If it missed the point, changing the font will not solve the underlying problem. Separate the story decision from the decorative decision and your feedback becomes much easier to act on.
SEE IT IN VIDMOAT · INTERACTIVE WALKTHROUGH
Give the agent a useful reference
Real editor screenshots · September 2026 · Select a step, then tap the image to zoom.
Actual editor capture; cropped where useful · 1 / 3
Check the target of your request
Open Ask AI. A selected-clip chip scopes the request to that clip. Remove the chip when your brief applies to the whole edit. These screenshots show the composer before sending.
Look for this
The Clean Title chip in this capture means the title is selected.
Actual editor capture; cropped where useful · 2 / 3
Separate inspiration from footage
Choose + Style reference for inspiration. Use the regular upload path for material that belongs in the video. Explain what you want to borrow: text placement, pace, palette or mood.
Look for this
The captured UI accepts reference images or the first two minutes of a reference video. Check the current limit in your app.
Phone browser view · 3 / 3
Find the same task on a phone
In the phone browser, use AI in the bottom navigation to reach the chat. Open the relevant panel instead of trying to fit the entire desktop workspace on screen.
Look for this
This is the responsive web editor. Native app arrangements may differ.
Step 1 of 3
Follow along in Vidmoat
Open the project that contains your intended sources.
Name the source files or selected clips so the scope is clear.
Write the target audience, message, length and frame shape.
List what must stay and what should be removed.
Request a rough cut first, then review it before adding finishing work.
A prompt you can adapt
Use my uploaded desk-lamp recording to make a 30-second 9:16 review. Start on the first useful sentence, remove sitting down and getting up, keep one benefit and one limitation, and end on my verdict. Preserve my wording and meaning. Make a rough cut with no music or new media first.
Your turn
Rewrite “Make this exciting” for a podcast clip and for a quiet cooking tutorial. Give each a different pacing instruction.
What a successful attempt looks like
Podcast example: remove repeated setup, retain the full argument and a natural breath. Cooking example: keep the safety instruction and hold each step long enough to follow.
A common trap
A long prompt with incompatible demands, such as slow and calm plus a cut every half second, makes the result difficult to judge.
Saved in this browser only. Download your notes from the course menu to keep a copy.
Attach a reference and explain exactly which qualities should influence your edit.
A reference works best when you can name what you like. You might admire the large opening title, the space around the subject, or the way a review uses a brief close-up to support a claim. Those are decisions you can describe and adapt. “Do exactly this” often imports details that do not fit your footage.
Use Style reference for an image or video that guides the edit. Use Add footage for material that should appear in the finished video. These are separate actions. In this course edition, style references support images and videos, with up to four attached references. Video inspection covers the first two minutes. If the useful moment is later, supply a short excerpt you are entitled to use.
A style reference is also different from a character or product reference used during generation. The first guides an edit’s look; the second guides the appearance of newly generated media. Neither guarantees an exact copy. The agent may fail to inspect a reference, in which case you should retry or describe it yourself rather than assume it was understood.
SEE IT IN VIDMOAT · INTERACTIVE WALKTHROUGH
Give the agent a useful reference
Real editor screenshots · September 2026 · Select a step, then tap the image to zoom.
Actual editor capture; cropped where useful · 1 / 3
Check the target of your request
Open Ask AI. A selected-clip chip scopes the request to that clip. Remove the chip when your brief applies to the whole edit. These screenshots show the composer before sending.
Look for this
The Clean Title chip in this capture means the title is selected.
Actual editor capture; cropped where useful · 2 / 3
Separate inspiration from footage
Choose + Style reference for inspiration. Use the regular upload path for material that belongs in the video. Explain what you want to borrow: text placement, pace, palette or mood.
Look for this
The captured UI accepts reference images or the first two minutes of a reference video. Check the current limit in your app.
Phone browser view · 3 / 3
Find the same task on a phone
In the phone browser, use AI in the bottom navigation to reach the chat. Open the relevant panel instead of trying to fit the entire desktop workspace on screen.
Look for this
This is the responsive web editor. Native app arrangements may differ.
Step 1 of 3
Follow along in Vidmoat
Open Style reference in the dashboard or project chat.
Attach resources/style-layout.png, or your own permitted example.
Wait for upload and inspection. Read any failure message.
Describe two qualities to borrow and one quality to avoid.
Check the next edit against those specific qualities, not against an imagined perfect match.
A prompt you can adapt
Use this reference for its large left-aligned title and generous space around the product. Keep my own footage, wording and orange accent. Do not copy its logo, soundtrack or subject. If you cannot inspect the attachment, tell me before editing.
Your turn
Attach one example. Write “Borrow…” and “Keep…” statements. If attachment access is unavailable, write the same guidance in plain text and complete the exercise without it.
What a successful attempt looks like
You can point to the borrowed layout decision in your result while the content remains yours.
A common trap
Attaching a whole ten-minute video does not mean every moment was inspected. Narrow the example to the part that matters.
Saved in this browser only. Download your notes from the course menu to keep a copy.
Give precise feedback and recover from an unwanted edit.
A first pass is something to respond to. Watch it as a viewer and name the moment that fails: “The title covers the lamp at six seconds” is actionable. “It is still bad” gives the agent no useful location or criterion.
Make revision requests small enough to inspect. If you like the cuts but dislike the sound, say so and limit the next change to sound. Distinguish source time from timeline time. Source time is a position in the original file; timeline time is a position in your edited sequence. A cut changes the relationship between them.
Use Undo promptly when a change damages the edit. Stop a running edit before making competing changes yourself. Keep a written brief and revision notes for important projects; do not rely on chat memory as the only record of the intended result. A useful revision log says what changed, why and whether the change survived review.
SEE IT IN VIDMOAT · INTERACTIVE WALKTHROUGH
Give the agent a useful reference
Real editor screenshots · September 2026 · Select a step, then tap the image to zoom.
Actual editor capture; cropped where useful · 1 / 3
Check the target of your request
Open Ask AI. A selected-clip chip scopes the request to that clip. Remove the chip when your brief applies to the whole edit. These screenshots show the composer before sending.
Look for this
The Clean Title chip in this capture means the title is selected.
Actual editor capture; cropped where useful · 2 / 3
Separate inspiration from footage
Choose + Style reference for inspiration. Use the regular upload path for material that belongs in the video. Explain what you want to borrow: text placement, pace, palette or mood.
Look for this
The captured UI accepts reference images or the first two minutes of a reference video. Check the current limit in your app.
Phone browser view · 3 / 3
Find the same task on a phone
In the phone browser, use AI in the bottom navigation to reach the chat. Open the relevant panel instead of trying to fit the entire desktop workspace on screen.
Look for this
This is the responsive web editor. Native app arrangements may differ.
Step 1 of 3
Follow along in Vidmoat
Play the saved result and identify one specific problem.
Write its timeline time and the affected clip or text.
Ask for one change while naming what should stay.
Review that moment plus the joins before and after it.
Accept the result, or stop further work and use Undo to recover.
A prompt you can adapt
At timeline 00:06, move the “Small desk” title away from the lamp and reduce its size slightly. Keep the wording, colour, music and all cuts unchanged. Show me the revised moment before doing anything else.
Your turn
Make a title deliberately too large, then correct only its placement and size. Record the before and after decision in one sentence.
What a successful attempt looks like
Only the requested title changes, and it remains visible long enough to read. If other parts changed, you notice and restore them.
A common trap
Sending several correction requests while the first is still running makes it harder to know which result you are reviewing.
Saved in this browser only. Download your notes from the course menu to keep a copy.
Open with a useful promise and support it with evidence.
A hook is a reason to keep watching. It does not have to be a shout or a surprising claim. “Here is why this lamp stayed on my small desk” creates a question the rest of the video can answer. A close-up showing the useful feature can do the same job without extra words.
Watch the source before choosing the opening. Find the strongest complete statement, then check the sentences around it. Removing “for my small desk” from “this is the best lamp for my small desk” changes a personal judgement into a broader claim. An edit that attracts attention by changing the meaning is a poor edit.
For the review project, use a simple sequence: reason to care, demonstration, limitation, verdict. These are story functions, not rigid time slots. If the demonstration takes longer than the opening, give it the time it needs. A useful ending answers the question raised by the beginning.
SEE IT IN VIDMOAT · INTERACTIVE WALKTHROUGH
From a file to your first timeline clip
Real editor screenshots · September 2026 · Select a step, then tap the image to zoom.
Actual editor capture; cropped where useful · 1 / 3
Start in the Media library
Choose Upload / drop media and select the three lamp images from the practice pack. A source in the library is available to use; it is not yet part of the finished video.
Look for this
Find the upload area, then the three source cards.
Actual editor capture; cropped where useful · 2 / 3
Place a source on the timeline
Double-click lamp-wide.png in the library. In this captured example, it becomes a five-second clip on V1. Select the clip before changing its properties.
Look for this
Look for the outlined clip on V1. The ruler above it is time.
Actual editor capture; cropped where useful · 3 / 3
Read the whole workspace
The library is on the left, the picture in the middle, and the selected clip’s Motion controls on the right. The timeline below decides what appears and when.
Look for this
Select your own clip and check that the inspector follows your selection.
Step 1 of 3
Follow along in Vidmoat
Watch the raw take once without cutting.
Mark two possible opening statements and their source times.
Read or listen to the surrounding context for both.
Choose the opening that your later shots can support.
Arrange a rough sequence with a benefit, limitation and verdict.
A prompt you can adapt
Find two possible hooks in my recording. Quote the exact spoken words with source times, explain what each promises, and flag any context that must stay. Recommend one without making the edit yet.
Your turn
Use the review recording script in the resource kit. Choose a hook and write the shot that will prove it. Then propose a second opening that uses a close-up instead of a spoken claim.
What a successful attempt looks like
Your hook is truthful, understandable without background knowledge and answered by the end.
A common trap
A dramatic headline about battery life is unsupported when your footage only shows the lamp switching on.
Saved in this browser only. Download your notes from the course menu to keep a copy.
Remove unwanted starts, ends and pauses while preserving natural delivery.
The time before a person starts speaking usually belongs to the recording process rather than the story. You can remove sitting down, reaching for the camera and the final walk away. Leave enough space around the first and last words for them to sound complete.
Trimming moves a clip’s edge. Splitting creates separate pieces at a chosen point. To remove a pause in the middle, split before and after the pause, delete the unwanted piece and check the resulting gap. Do not assume every delete closes space automatically. A blank frame or a silent hole can survive on the timeline.
Not every pause is dead time. A breath before a conclusion helps a viewer follow the thought. Start conservatively, then compare the tighter cut with the original. If the speaker suddenly sounds nervous or words collide, restore a little space. Speed is useful only while meaning and comfort survive.
SEE IT IN VIDMOAT · INTERACTIVE WALKTHROUGH
From a file to your first timeline clip
Real editor screenshots · September 2026 · Select a step, then tap the image to zoom.
Actual editor capture; cropped where useful · 1 / 3
Start in the Media library
Choose Upload / drop media and select the three lamp images from the practice pack. A source in the library is available to use; it is not yet part of the finished video.
Look for this
Find the upload area, then the three source cards.
Actual editor capture; cropped where useful · 2 / 3
Place a source on the timeline
Double-click lamp-wide.png in the library. In this captured example, it becomes a five-second clip on V1. Select the clip before changing its properties.
Look for this
Look for the outlined clip on V1. The ruler above it is time.
Actual editor capture; cropped where useful · 3 / 3
Read the whole workspace
The library is on the left, the picture in the middle, and the selected clip’s Motion controls on the right. The timeline below decides what appears and when.
Look for this
Select your own clip and check that the inspector follows your selection.
Step 1 of 3
Follow along in Vidmoat
Select the clip and play the first few seconds closely.
Drag the start edge just before the first intended word; check the first consonant.
Trim the end after the final word and a short natural release.
For an internal pause, place the playhead and use Split on each side. Remove only the unwanted section.
Close any unintended gap and play across every new cut at normal speed.
A prompt you can adapt
Remove the setup before my first useful sentence and the ending where I leave. Tighten obvious dead air inside the review, but preserve breaths, complete words and the limitation. Do not speed up my voice.
Your turn
Record a sentence with a three-second pause in the middle. Make one very tight cut and one with a brief breath. Listen without looking at the picture and choose the more natural version.
What a successful attempt looks like
The first and final words are intact, and the internal cut sounds like a human sentence rather than a stitched list.
A common trap
Using a silence threshold as an automatic delete rule can remove quiet words, deliberate pauses or soft music.
Saved in this browser only. Download your notes from the course menu to keep a copy.
Place B-roll where it adds evidence and preserve the main audio.
B-roll is supporting footage shown while the main story continues. In a lamp review, a close-up of the switch belongs near the sentence about the switch. A random city skyline may look polished but adds little to that claim.
Put a supporting shot on a visual track above the speaking clip when you want the narration to continue underneath. Check its audio: a noisy camera recording can compete with the speaker. Mute that supporting clip if you only need its picture. Listen again after the change so you do not accidentally mute the main voice.
B-roll can hide a visible jump between two parts of a talking-head recording. It should still have a reason to be there. Start it around the idea being explained and end it when the viewer has had time to see the detail. Repeatedly cutting away before the viewer understands a shot makes the video feel busy rather than helpful.
SEE IT IN VIDMOAT · INTERACTIVE WALKTHROUGH
From a file to your first timeline clip
Real editor screenshots · September 2026 · Select a step, then tap the image to zoom.
Actual editor capture; cropped where useful · 1 / 3
Start in the Media library
Choose Upload / drop media and select the three lamp images from the practice pack. A source in the library is available to use; it is not yet part of the finished video.
Look for this
Find the upload area, then the three source cards.
Actual editor capture; cropped where useful · 2 / 3
Place a source on the timeline
Double-click lamp-wide.png in the library. In this captured example, it becomes a five-second clip on V1. Select the clip before changing its properties.
Look for this
Look for the outlined clip on V1. The ruler above it is time.
Actual editor capture; cropped where useful · 3 / 3
Read the whole workspace
The library is on the left, the picture in the middle, and the selected clip’s Motion controls on the right. The timeline below decides what appears and when.
Look for this
Select your own clip and check that the inspector follows your selection.
Step 1 of 3
Follow along in Vidmoat
Identify one sentence that would benefit from a visual example.
Add a matching close-up to a track above the main recording.
Align it with the relevant sentence, using timeline time.
Mute the close-up audio if it is unnecessary. Keep the narration audible.
Play the sentence before, during and after the insert. Adjust its duration.
A prompt you can adapt
Show my uploaded switch close-up while I explain the switch. Keep the main recording’s voice continuous underneath and mute the close-up’s camera audio. Use the real product shot, not generated replacement footage.
Your turn
Cover one visible talking-head jump with a relevant detail shot. Then remove the insert and compare what the viewer understands in each version.
What a successful attempt looks like
The insert supports a specific phrase, stays visible long enough to inspect, and does not interrupt the voice.
A common trap
Putting two full-volume recordings on top of one another can create an echo or a distracting second conversation.
Saved in this browser only. Download your notes from the course menu to keep a copy.
Correct words and timing against the actual recording.
Captions help people follow speech when sound is quiet, unavailable or difficult to understand. They also make transcription errors public. Before choosing a style, listen for names, numbers, negations and product terms. “It does not charge” and “it does charge” are very different reviews.
Ask the agent to caption the intended spoken clips, or use the available caption and transcript controls. Check which source is being transcribed. A project with music, camera audio and narration can contain several possible inputs. Finish the main speech cuts first so you do not spend time correcting captions that no longer match the sequence.
Transcript corrections and visible caption clips may be separate. After correcting a transcript, confirm that the text on the timeline changed too; regenerate the relevant captions if necessary. Pasted scripts can help, but estimated timing is not the same as timing obtained from the recording. Always watch the displayed words with the sound on.
SEE IT IN VIDMOAT · INTERACTIVE WALKTHROUGH
Give a title room to breathe
Real editor screenshots · September 2026 · Select a step, then tap the image to zoom.
Actual editor capture; cropped where useful · 1 / 3
Write the message
Add a Clean Title from Text, select its timeline clip, and open Style. Replace the content with Small desk. Big difference. This is an emphasis title, not a transcript.
Look for this
Content changes the words; font, size and fill change their treatment.
Actual editor capture; cropped where useful · 2 / 3
Notice the collision
This first attempt places the title over the lamp. The words compete with the detail we want people to see. Pause before adding more decoration.
Look for this
Ask what should get attention first: the product or the words?
Actual editor capture; cropped where useful · 3 / 3
Move into open space
Drag the selected title upward in the preview. The real captured edit clears the lamp. Next, improve size and contrast for your own footage and watch the whole shot.
Look for this
Compare the two frames. Moving a title can solve more than adding an effect.
Step 1 of 3
Follow along in Vidmoat
Finish the main speech edit and identify the narration clips.
Ask for captions for those clips, or use the caption controls available in your editor.
Play the first sentence and check text, timing and punctuation.
Correct names, numbers and any missing “not”. Inspect the visible caption result.
Remove duplicate caption sets and replay a section after the last cut.
A prompt you can adapt
Caption the spoken review on this timeline. Use the actual audio, preserve the words and flag anything uncertain. Check the product name and all numbers. Do not caption the instrumental bed or add a second overlapping caption set.
Your turn
Record: “This is a small desk lamp. It does not charge my phone.” Generate captions and verify every word. Deliberately change one word, then correct the visible caption.
What a successful attempt looks like
The words preserve the speaker’s meaning and appear with the relevant phrase. There is only one intended caption set.
A common trap
Styling incorrect words makes the error more noticeable. Fix content before appearance.
Saved in this browser only. Download your notes from the course menu to keep a copy.
Use stylish text without making the viewer read two competing messages.
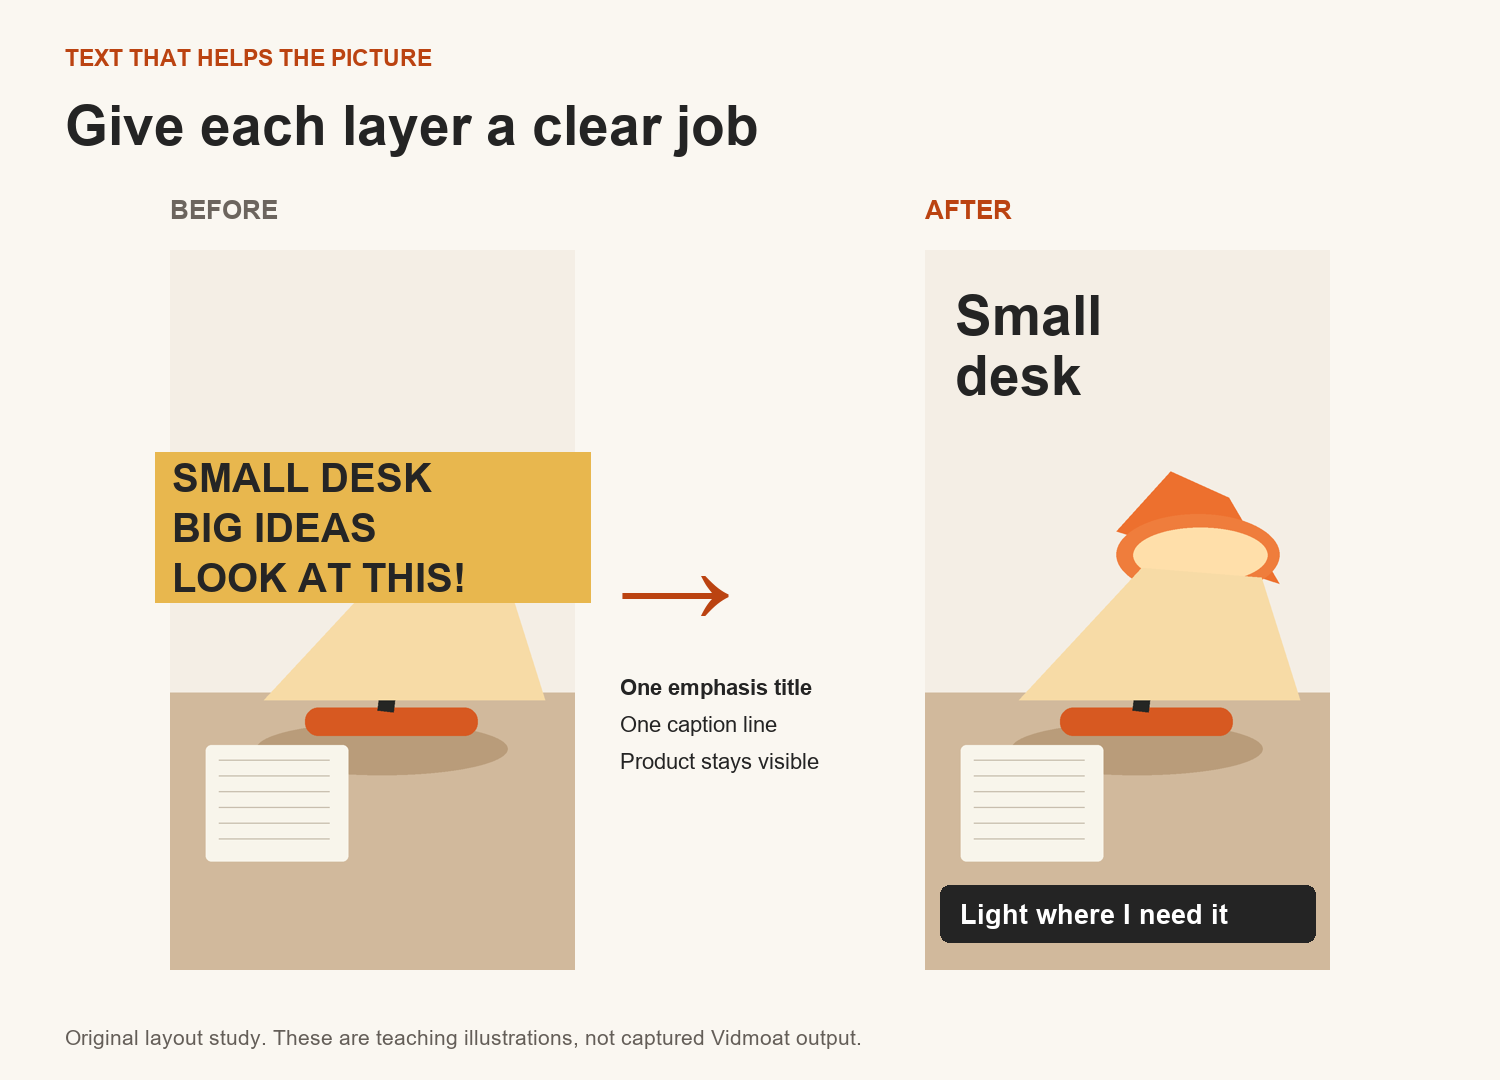
Captions carry the speech. Emphasis titles carry the important idea. You can use both, but they need different jobs. If every spoken word becomes a giant headline, there is no hierarchy left and the product disappears behind text.
For the review, keep captions near the lower part of the frame, with enough clearance for platform controls. Use a larger phrase such as “Small desk” beside the product when that idea arrives. The title can be shorter than the sentence because it is a summary. It must not change the claim.
Choose one type family, a small set of sizes and one accent colour. Vidmoat’s orange works well as an accent, while dark or light neutral text can provide the main contrast. Check the actual frame: orange against a warm lamp shade may be hard to read. A restrained shadow or background can help, but a stack of glow, outline and gradient can obscure the letter shapes.
Original layout study. Emphasis and captions have different jobs. Open the image for a larger view.
SEE IT IN VIDMOAT · INTERACTIVE WALKTHROUGH
Give a title room to breathe
Real editor screenshots · September 2026 · Select a step, then tap the image to zoom.
Actual editor capture; cropped where useful · 1 / 3
Write the message
Add a Clean Title from Text, select its timeline clip, and open Style. Replace the content with Small desk. Big difference. This is an emphasis title, not a transcript.
Look for this
Content changes the words; font, size and fill change their treatment.
Actual editor capture; cropped where useful · 2 / 3
Notice the collision
This first attempt places the title over the lamp. The words compete with the detail we want people to see. Pause before adding more decoration.
Look for this
Ask what should get attention first: the product or the words?
Actual editor capture; cropped where useful · 3 / 3
Move into open space
Drag the selected title upward in the preview. The real captured edit clears the lamp. Next, improve size and contrast for your own footage and watch the whole shot.
Look for this
Compare the two frames. Moving a title can solve more than adding an effect.
Step 1 of 3
Follow along in Vidmoat
Choose one readable caption style and apply it consistently.
Find the strongest three ideas in the edit and write short emphasis phrases.
Add one larger title for an idea, positioned away from the speaker and product.
Use orange on a key word or small accent, while maintaining clear contrast.
Play the title at normal speed and confirm it stays long enough to read once comfortably.
A prompt you can adapt
Keep the speech captions readable and consistent. Add a larger “Small desk” emphasis title beside the lamp only when I discuss its footprint. Use orange as an accent, avoid covering the product, and do not animate every word.
Your turn
Make two title versions: a full spoken sentence and a three-word summary. Compare them on a phone-sized preview and choose the one that supports the picture.
What a successful attempt looks like
A viewer can tell which text is speech and which text is emphasis. Neither blocks the demonstration.
A common trap
Using the same size, position and animation for all text makes everything compete for first place.
Saved in this browser only. Download your notes from the course menu to keep a copy.
Check text, cropping and pacing at the size people will watch.
A title that looks comfortable on a laptop can become tiny on a phone. A caption that sits inside the video frame can still be covered by a platform’s controls. There is no single safe margin that works for every app, placement and device, so test the destination as well as your editor.
Keep important faces, hands and words away from the extreme edges. For an initial layout, give text roughly a tenth of the frame width as breathing room and keep the lowest part of the frame clear of essential words. These are starting points, not platform specifications. A private or draft upload is the stronger check.
Accessibility also involves timing. A fast reader may follow a flashing title that another viewer misses. Watch once without sound, then listen once without looking. The silent pass tests whether captions and pictures carry the message. The listening pass reveals rushed cuts and music that hides words.
SEE IT IN VIDMOAT · INTERACTIVE WALKTHROUGH
Give a title room to breathe
Real editor screenshots · September 2026 · Select a step, then tap the image to zoom.
Actual editor capture; cropped where useful · 1 / 3
Write the message
Add a Clean Title from Text, select its timeline clip, and open Style. Replace the content with Small desk. Big difference. This is an emphasis title, not a transcript.
Look for this
Content changes the words; font, size and fill change their treatment.
Actual editor capture; cropped where useful · 2 / 3
Notice the collision
This first attempt places the title over the lamp. The words compete with the detail we want people to see. Pause before adding more decoration.
Look for this
Ask what should get attention first: the product or the words?
Actual editor capture; cropped where useful · 3 / 3
Move into open space
Drag the selected title upward in the preview. The real captured edit clears the lamp. Next, improve size and contrast for your own footage and watch the whole shot.
Look for this
Compare the two frames. Moving a title can solve more than adding an effect.
Step 1 of 3
Follow along in Vidmoat
Reduce the preview to phone-like size or view a downloaded draft on your phone.
Check every caption line break and the smallest essential word.
Move text away from faces, hands and likely interface overlays.
Watch once muted, then listen once without watching.
Use a private destination preview where available to inspect real overlays before publishing.
A prompt you can adapt
Review this vertical edit for phone readability. Check caption size, contrast, line breaks, edges and anything covering the product. Suggest specific timeline fixes. Do not claim a universal safe area for every social app.
Your turn
Ask someone to watch the draft once without pausing. Have them repeat the benefit and limitation. If they miss one, adjust the layout or duration and test again.
What a successful attempt looks like
Both the benefit and limitation remain understandable in one normal-speed viewing.
A common trap
Shrinking captions to fit a long line often solves the layout while breaking readability. Rewrite line breaks or split the caption instead.
Saved in this browser only. Download your notes from the course menu to keep a copy.
Balance and clean speech before adding music or effects.
A viewer may tolerate a slightly plain picture while learning something useful. A voice that is painful, muffled or buried is much harder to follow. Start with the original recording and headphones at a comfortable level. Listen for room noise, sudden level changes and distortion.
Lowering the volume of a distorted recording does not undo the distortion. Noise reduction can soften steady background noise, but too much may make a voice watery or metallic. Compression reduces the difference between louder and quieter moments; it is not a cure for every recording problem. Make one modest adjustment and compare it with the untreated version.
Select the intended clip before changing A/V or audio properties. If the voice and music were recorded together, ordinary clip volume changes both. Separating them perfectly is not something to assume. When a line is beyond repair, re-recording it in a quieter place may take less time and produce a better result than adding more processing.
Follow along in Vidmoat
Mute added music temporarily and listen to the main voice.
Select the speaking clip and open its A/V or audio properties.
Adjust obvious level differences so sentences are comfortable to hear.
If needed, apply a small amount of noise reduction and compare before and after.
Listen on headphones and a phone speaker. Re-record an unusable line if possible.
A prompt you can adapt
Inspect the voice in this clip and help make it easier to understand. Identify clipping or steady noise before changing settings. Use gentle processing, preserve a natural voice and tell me if the source cannot be repaired reliably.
Your turn
Record the same sentence near a fan and in a quiet corner. Try a gentle cleanup on the noisy take, then compare it with the quieter recording at similar listening levels.
What a successful attempt looks like
The voice is intelligible and natural. Your decision is based on listening, not on how many processing controls are enabled.
A common trap
Boosting everything until it sounds louder can introduce clipping or make noise more obvious.
Saved in this browser only. Download your notes from the course menu to keep a copy.
Balance a music bed and use transitions in sound deliberately.
Music changes how a scene feels before a viewer understands the words. A bright, light rhythm can suit a friendly tech review. A dense vocal song can compete with the review because the listener is trying to follow two sets of words at once. Choose by the job the music must do, not just by whether you like the track.
Start with the voice at a comfortable level, then bring the music up from silence until it supports the pace. If the first sentence becomes harder to understand, the music is too prominent for that moment. Use fades to avoid abrupt starts and stops. Ducking lowers music while speech is present; check that it does not audibly pump between every word.
The included practice-bed.wav is an original thirty-second rhythm for this course. It is useful for practising levels and fades, not a promise that one track will suit every genre. You can also use music you own or are licensed to use. A recognisable commercial song is not automatically permitted because it is available online.
Original 30-second practice rhythm. Start playback at a comfortable device volume.
Follow along in Vidmoat
Import practice-bed.wav through the media library and place it on an audio track.
Trim it to the edit length and start it quietly under the voice.
Apply short fades at the opening and ending.
Use Duck under speech if available, or lower the bed manually during narration.
Listen to the quietest sentence and the ending. Adjust levels and fades before exporting.
A prompt you can adapt
Use my uploaded practice bed under the review. Keep the voice clearly in front, fade the bed in and out, and lower it during speech. Do not add a vocal song or new sound effects. Check the quietest spoken sentence.
Your turn
Make one mix with music too loud, then a second with the voice clearly leading. Compare at the same device volume. Write what became easier to hear.
What a successful attempt looks like
Every word is understandable, the music enters smoothly, and the ending sounds intentional.
A common trap
A louder mix can feel more exciting in a quick comparison. Match playback volume before deciding it is better.
Saved in this browser only. Download your notes from the course menu to keep a copy.
Ask the agent to listen and verify what it reports
Use audio inspection for music, sounds and sung words without treating estimates as certainty.
Speech transcription and audio understanding answer different questions. A transcript asks what was said. Audio inspection can help describe sounds, locate energy changes or estimate a beat. Lyric listening asks about sung or rapped words. A failed speech transcript does not prove that a song has no vocals.
Give the agent a short range and a specific question. In this edition, source audio inspection normally begins with thirty seconds and supports explicitly selected excerpts up to two minutes. Results describe the inspected excerpt, not necessarily the final mix with every effect and track. Ask whether reported times are source, clip-local or timeline times before cutting on them.
Lyric phrases may include uncertainty and their timing may drift. Listen to the actual recording and keep unclear words unresolved until you can verify them. Sound descriptions cannot reliably establish the song title or artist. The agent can also fail or be unavailable; that should lead to a manual check, not a guessed soundtrack description.
Listening control: two short tones at 2 and 6 seconds; the remaining intervals are silent.
Follow along in Vidmoat
Use sound-check.wav from the resource kit as a simple control.
Ask the agent to inspect the first ten seconds and describe the audible events.
Listen yourself: the file has two short tones beginning at two and six seconds.
For your own vocal music, request lyric listening and uncertainty explicitly.
Confirm words and edit points manually before turning the result into captions or cuts.
A prompt you can adapt
Listen to the actual audio from source 00:00 to 00:10. Report audible events and the inspected range, with uncertainty. Do not infer sounds from the picture. For sung material, use lyric listening and mark unclear words instead of filling them from memory.
Your turn
Inspect the two-tone control and compare the report with what you hear. Then record or use an original sung phrase and test lyric listening. If unavailable, annotate it yourself and continue.
What a successful attempt looks like
You distinguish measured timing, model description and your own listening. You do not treat estimated lyric phrases as word-perfect karaoke captions.
A common trap
“The model says it is rain” is not proof of sound identity. Check the recording, especially when extra events appear in silent sections.
Saved in this browser only. Download your notes from the course menu to keep a copy.
Choose fit, crop and position to protect the information in each shot.
Turning a landscape recording into a vertical video is a composition decision. A centre crop may keep the face but remove the hands demonstrating a product. Before choosing automatic reframing, decide what must remain visible in each moment.
Select the visual clip and adjust its scale and position in Motion or the corresponding properties area. Move the playhead through the shot. A crop that works on the first frame can fail when the subject leans sideways. If you cannot keep both the face and the demonstration, consider a supporting close-up, a wider fitted view or a different source shot.
Digital enlargement uses the pixels already available. A 4K export does not turn a badly focused small crop into genuine 4K detail. Judge the result at its intended viewing size. Prefer a slightly wider clean image to a close-up that makes the product impossible to inspect.
SEE IT IN VIDMOAT · INTERACTIVE WALKTHROUGH
Make a deliberate picture adjustment
Real editor screenshots · September 2026 · Select a step, then tap the image to zoom.
Actual editor capture; cropped where useful · 1 / 2
Select first, transform second
Select the image clip, then open Motion. Scale changes the size; X and Y change position. A diamond beside a property is a keyframe control.
Look for this
Start with a still composition that works. Then follow the lesson to animate it.
Actual editor capture; cropped where useful · 2 / 2
Adjust with a reason
Open Color for the selected clip. Inspect the real controls in this panel, change one thing at a time, and compare against the original. The lamp artwork is a teaching source, not a skin-tone grading test.
Look for this
Use your own representative footage for the colour exercise; do not copy arbitrary values from a screenshot.
Step 1 of 2
Follow along in Vidmoat
Choose the final aspect ratio in Project Settings.
Select the clip and identify the essential subject and action.
Adjust scale and position without hiding hands, labels or the product feature.
Check the start, middle, end and any large subject movement.
Use another shot or a fitted layout if cropping removes essential evidence.
A prompt you can adapt
Reframe this review for 9:16. Keep my face and the lamp demonstration visible. Inspect the moments where my hands move. If a crop loses the feature, suggest a wider layout or a cutaway instead of zooming further.
Your turn
Crop lamp-wide.png into a vertical frame, then compare it with a fitted version. Identify which choice better shows the lamp’s footprint.
What a successful attempt looks like
The intended feature is visible throughout its explanation, with no accidental head or hand cuts.
A common trap
A frame that looks good while paused may fail during movement. Check the whole action.
Saved in this browser only. Download your notes from the course menu to keep a copy.
Create one controlled move and explain why it belongs there.
A keyframe records a property value at a particular time. Put a normal scale at the start of a moment and a slightly larger scale later, and the editor can move between them. The point is to guide attention, not to prove that you found the animation controls.
For a review, a small push towards the product can underline a useful detail. For a tutorial, a brief zoom can help someone read a control. For a quiet interview, holding the frame may be the stronger choice. Movement feels more natural when its beginning and ending are gentle rather than mechanically abrupt.
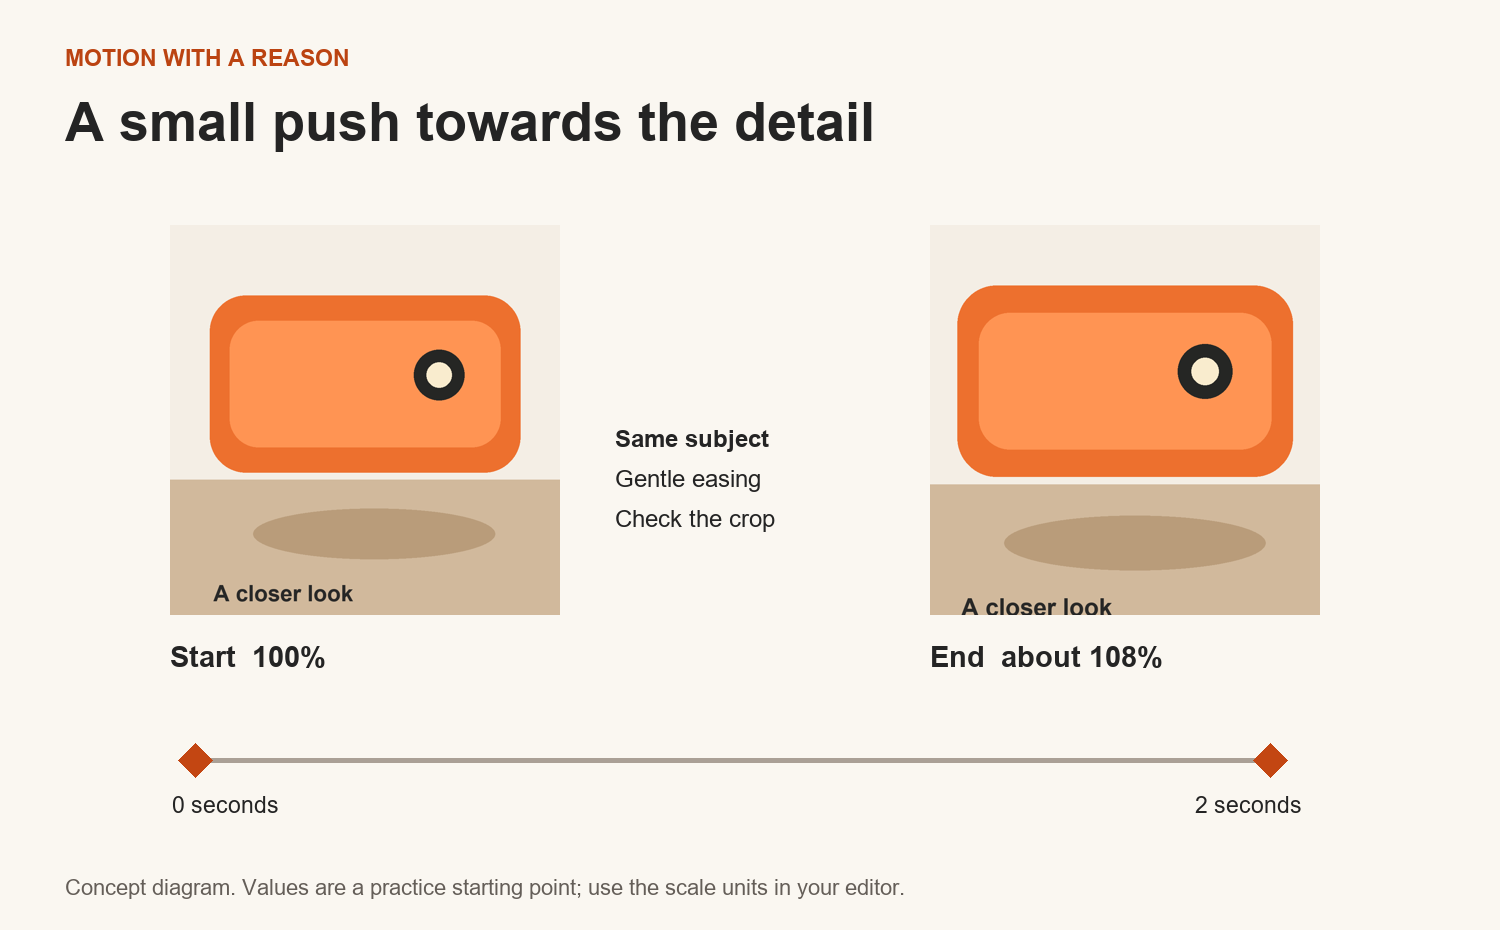
Try a small change first. Moving from 100 percent to roughly 108 percent over two seconds is an exercise starting point, not a universal recipe. Check the frame edges and source sharpness. If the editor uses a different scale unit, ask for an eight-percent relative enlargement. Preserve the subject’s position so the move does not drift away from the detail.
A small move towards the detail. These are practice values, not a required preset.
SEE IT IN VIDMOAT · INTERACTIVE WALKTHROUGH
Make a deliberate picture adjustment
Real editor screenshots · September 2026 · Select a step, then tap the image to zoom.
Actual editor capture; cropped where useful · 1 / 2
Select first, transform second
Select the image clip, then open Motion. Scale changes the size; X and Y change position. A diamond beside a property is a keyframe control.
Look for this
Start with a still composition that works. Then follow the lesson to animate it.
Actual editor capture; cropped where useful · 2 / 2
Adjust with a reason
Open Color for the selected clip. Inspect the real controls in this panel, change one thing at a time, and compare against the original. The lamp artwork is a teaching source, not a skin-tone grading test.
Look for this
Use your own representative footage for the colour exercise; do not copy arbitrary values from a screenshot.
Step 1 of 2
Follow along in Vidmoat
Choose a two-second moment with a clear visual reason to move.
Select the clip and open Motion or its keyframe controls.
Set the starting scale and position at the beginning of the moment.
Add a later keyframe with a small enlargement and adjust the end position if needed.
Apply gentle easing where available, then play the move and compare with a still version.
A prompt you can adapt
Add one gentle two-second push-in while I show the lamp switch. Enlarge by about eight percent relative to the current framing, keep the switch visible and use smooth easing. Leave other shots still.
Your turn
Create one push-in and one version with no move. Ask which version makes the feature easier to notice, and remove the motion if it adds no value.
What a successful attempt looks like
The movement supports the exact demonstration and has no sudden jump or unwanted crop.
A common trap
Adding a zoom to every sentence makes all moments feel equally important and can cause visual fatigue.
Saved in this browser only. Download your notes from the course menu to keep a copy.
Make adjacent shots feel consistent without damaging skin or product colour.
Colour correction makes shots believable and compatible. A creative look adds a mood. Start with correction: can you see detail in the bright lamp shade, are shadows readable, and does a neutral object look strangely green or blue? Work on one representative shot before copying adjustments widely.
Open Color on the selected clip and make small changes. Compare neighbouring shots rather than grading each one in isolation. A warm lamp and a window-lit desk may naturally look different; matching them does not mean forcing every pixel to the same colour. Preserve the intended lighting while avoiding distracting jumps.
Be careful with skin. A global hue change moves skin and product colours along with the background. Do not brighten every face to one fixed target. People have different skin tones, and the surrounding scene matters. Use your eyes, available scopes and before-and-after comparisons. If a strong preset makes the lamp colour or skin implausible, reduce its influence or remove it.
SEE IT IN VIDMOAT · INTERACTIVE WALKTHROUGH
Make a deliberate picture adjustment
Real editor screenshots · September 2026 · Select a step, then tap the image to zoom.
Actual editor capture; cropped where useful · 1 / 2
Select first, transform second
Select the image clip, then open Motion. Scale changes the size; X and Y change position. A diamond beside a property is a keyframe control.
Look for this
Start with a still composition that works. Then follow the lesson to animate it.
Actual editor capture; cropped where useful · 2 / 2
Adjust with a reason
Open Color for the selected clip. Inspect the real controls in this panel, change one thing at a time, and compare against the original. The lamp artwork is a teaching source, not a skin-tone grading test.
Look for this
Use your own representative footage for the colour exercise; do not copy arbitrary values from a screenshot.
Step 1 of 2
Follow along in Vidmoat
Select one representative shot and inspect bright and dark detail.
Correct obvious brightness or colour imbalance using small changes.
Compare the next shot at the cut and adjust distracting differences.
Try a restrained look only after the correction works.
Toggle the treatment and inspect skin, neutral objects and the actual product colour.
A prompt you can adapt
Make these two shots feel consistent while preserving the warm desk light. Keep skin natural and avoid rotating every hue. Protect detail in the bright shade. Make small corrections first, then show me the comparison before adding a stronger look.
Your turn
Apply a strong preset, note what happens to a neutral surface and the product, then reduce or replace it. Explain the version you choose.
What a successful attempt looks like
Shots feel related, key detail remains visible, and the grade does not misrepresent the product.
A common trap
Choosing the most dramatic preset in isolation can create inconsistent shots or unnatural skin.
Saved in this browser only. Download your notes from the course menu to keep a copy.
Choose between filming, existing media, stock and generation.
A missing shot does not always need an AI generation. If you need to show the real lamp switching on, filming the real switch gives more trustworthy evidence. If you need an abstract illustration of a late-night idea, a generated image may be appropriate.
Write the job of the missing asset before opening Generate. Describe the subject, action, framing, lighting and intended placement. Ask for one useful asset first. Large batches can consume credits before you know whether the direction works. Check the available provider, plan and price shown in your account; this course does not require paid generation to complete the main projects.
Generated media can invent lettering, change a product feature or create continuity problems. Inspect it before importing it into the final sequence. Do not present a generated demonstration as proof of a real product’s performance. When generation is unavailable, use the included illustrations, a simple title card or another shot you can record yourself.
SEE IT IN VIDMOAT · INTERACTIVE WALKTHROUGH
Give the agent a useful reference
Real editor screenshots · September 2026 · Select a step, then tap the image to zoom.
Actual editor capture; cropped where useful · 1 / 3
Check the target of your request
Open Ask AI. A selected-clip chip scopes the request to that clip. Remove the chip when your brief applies to the whole edit. These screenshots show the composer before sending.
Look for this
The Clean Title chip in this capture means the title is selected.
Actual editor capture; cropped where useful · 2 / 3
Separate inspiration from footage
Choose + Style reference for inspiration. Use the regular upload path for material that belongs in the video. Explain what you want to borrow: text placement, pace, palette or mood.
Look for this
The captured UI accepts reference images or the first two minutes of a reference video. Check the current limit in your app.
Phone browser view · 3 / 3
Find the same task on a phone
In the phone browser, use AI in the bottom navigation to reach the chat. Open the relevant panel instead of trying to fit the entire desktop workspace on screen.
Look for this
This is the responsive web editor. Native app arrangements may differ.
Step 1 of 3
Follow along in Vidmoat
Identify the exact gap in your story and write the job of the missing shot.
Decide whether real footage is necessary to support the claim.
If generation fits, open AI Generate and choose image or video.
Review the displayed cost and settings; request a single short or still asset first.
Inspect the result, then add it to the timeline only if it serves the brief.
A prompt you can adapt
Create one illustration of a quiet desk at night, with open space on the left for my own title. Warm light, simple composition, no text or logos. This is a concept illustration, not a photograph of the product I am reviewing.
Your turn
List three missing shots for your project. Mark each “film”, “reuse” or “generate”, and explain the choice. Complete one with the lowest-cost suitable method.
What a successful attempt looks like
Every new asset has a defined purpose, and evidence about real products still comes from real material.
A common trap
Generating a better-looking product image can accidentally show features the product does not have.
Saved in this browser only. Download your notes from the course menu to keep a copy.
Use optional references and a continuity checklist across generated shots.
Consistency is a choice. A mood montage may need varied subjects; a three-shot story about one robot needs a recognisable robot. Decide before generating. A text-only request remains a valid way to create a fresh subject.
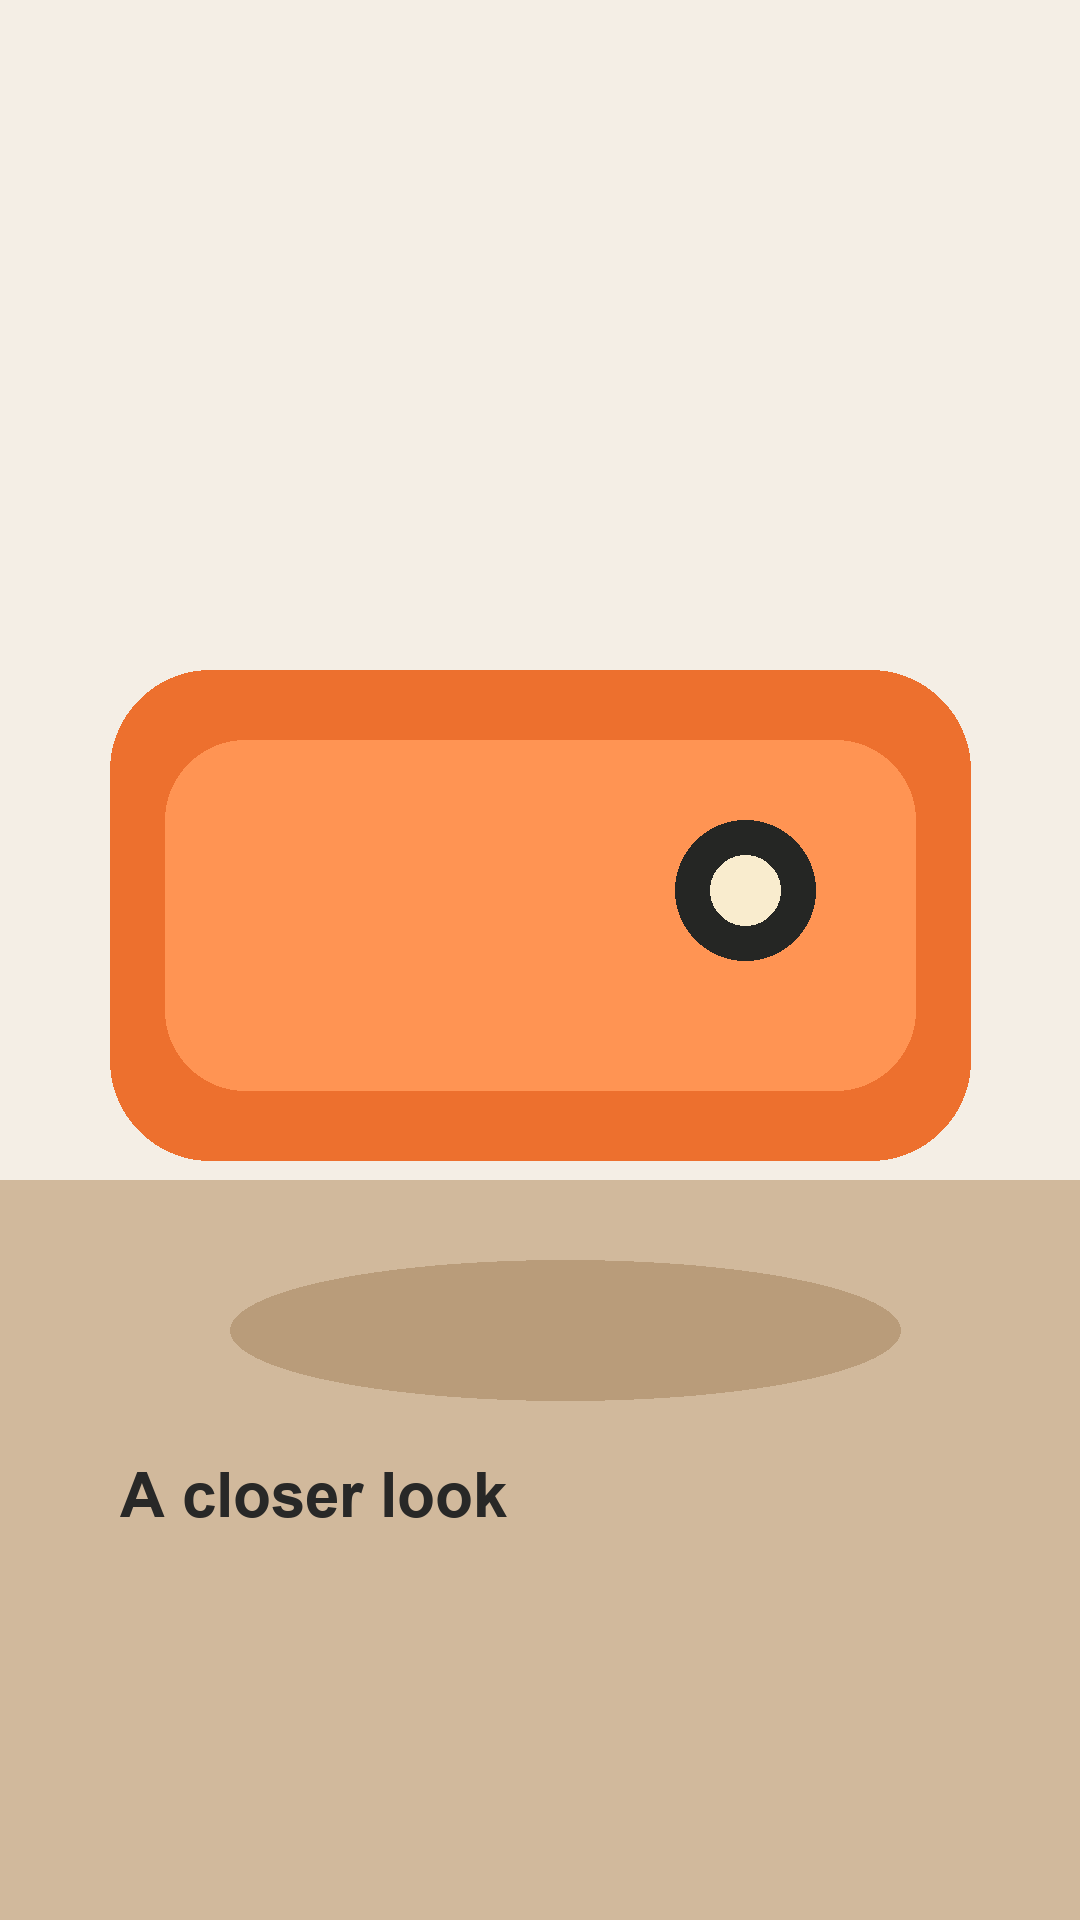
For a continuing character, prepare a clean reference image and a short description of the features that must stay. Our original reference is an orange desk robot with a round head, dark face panel, two pale eyes and a small antenna. Keep that description stable while changing only the action or camera view between shots.
Use Character / product reference in Generate when the selected provider supports it. In this edition, reference-led image and video generation uses Grok; current controls impose limits that differ by media type. Video references are limited to the supported resolution shown in the interface, currently up to 720p. Reference similarity is guidance, not an identity guarantee. Check colour, face, proportions, accessories and background continuity in each result. There is no saved character library to assume; keep your own reference file and brief.
A reference guides recognisability. Inspect each new result for drift.
SEE IT IN VIDMOAT · INTERACTIVE WALKTHROUGH
Give the agent a useful reference
Real editor screenshots · September 2026 · Select a step, then tap the image to zoom.
Actual editor capture; cropped where useful · 1 / 3
Check the target of your request
Open Ask AI. A selected-clip chip scopes the request to that clip. Remove the chip when your brief applies to the whole edit. These screenshots show the composer before sending.
Look for this
The Clean Title chip in this capture means the title is selected.
Actual editor capture; cropped where useful · 2 / 3
Separate inspiration from footage
Choose + Style reference for inspiration. Use the regular upload path for material that belongs in the video. Explain what you want to borrow: text placement, pace, palette or mood.
Look for this
The captured UI accepts reference images or the first two minutes of a reference video. Check the current limit in your app.
Phone browser view · 3 / 3
Find the same task on a phone
In the phone browser, use AI in the bottom navigation to reach the chat. Open the relevant panel instead of trying to fit the entire desktop workspace on screen.
Look for this
This is the responsive web editor. Native app arrangements may differ.
Step 1 of 3
Follow along in Vidmoat
Choose whether this story actually needs the same subject across shots.
Attach resources/robot-reference.png using Character / product reference in Generate.
Write the character’s fixed features and the action for shot one.
Reuse the same reference and fixed features for the next shot; change only the action or framing.
Compare results side by side. Reject visible drift before building the sequence.
A prompt you can adapt
Use the attached orange robot as the same fictional character. Preserve the round head, dark face panel, two pale eyes and antenna. In this shot it notices a desk lamp. Keep the design simple and do not add lettering. Use the reference only because this story needs continuity.
Your turn
Plan three shots: the robot notices the lamp, reaches towards it, and sits in the warm light. Generate one if your account allows it, or use the original reference as a still and practise framing. Fill in the continuity checklist for each shot.
What a successful attempt looks like
You can name what stayed consistent and what drifted. You do not claim that all generated shots are identical.
A common trap
A style reference attached in chat does not automatically become a generation identity reference.
Saved in this browser only. Download your notes from the course menu to keep a copy.
Plan original narration or music and evaluate the actual result.
Generated narration can help when you cannot record a voice, but the script still needs to sound like a person. Read it aloud before generating. Short sentences and concrete words usually survive better than a paragraph packed with slogans. Use the same available voice selection across a series when continuity matters.
For music, describe the role: a light instrumental bed under speech, a sparse reflective opening, or a short energetic ending. If a generation option supports vocals, say whether you want original lyrics or an instrumental. Do not assume a successful generation request produced the requested words; listen to the output.
Avoid imitating a real person without appropriate permission. Check the terms that apply to any generated or licensed asset before commercial distribution. Keep a copy of your prompt, selected settings and asset origin. If generation is unavailable or outside your budget, record your own narration and use the supplied practice bed. The editing skills are the same.
SEE IT IN VIDMOAT · INTERACTIVE WALKTHROUGH
Give the agent a useful reference
Real editor screenshots · September 2026 · Select a step, then tap the image to zoom.
Actual editor capture; cropped where useful · 1 / 3
Check the target of your request
Open Ask AI. A selected-clip chip scopes the request to that clip. Remove the chip when your brief applies to the whole edit. These screenshots show the composer before sending.
Look for this
The Clean Title chip in this capture means the title is selected.
Actual editor capture; cropped where useful · 2 / 3
Separate inspiration from footage
Choose + Style reference for inspiration. Use the regular upload path for material that belongs in the video. Explain what you want to borrow: text placement, pace, palette or mood.
Look for this
The captured UI accepts reference images or the first two minutes of a reference video. Check the current limit in your app.
Phone browser view · 3 / 3
Find the same task on a phone
In the phone browser, use AI in the bottom navigation to reach the chat. Open the relevant panel instead of trying to fit the entire desktop workspace on screen.
Look for this
This is the responsive web editor. Native app arrangements may differ.
Step 1 of 3
Follow along in Vidmoat
Write a narration of roughly 40 to 60 words for a short demonstration and read it aloud.
Use the available voiceover generation control, or record your own voice.
Listen for incorrect names, odd pauses and an unnatural pace.
For an optional music generation, request a clear mood, duration and instrumental or vocal intent.
Import the accepted assets, balance them against each other and verify any words by listening.
A prompt you can adapt
Create an original, light instrumental bed for a friendly desk-product demonstration. Leave room for narration, avoid vocals and a huge dramatic ending. I will review the actual audio before using it.
Your turn
Read the supplied lamp narration naturally and time it. If it runs long, remove one idea instead of rushing every word. Use recorded or generated narration and compare it with the silent version.
What a successful attempt looks like
The narration fits the available time without sounding hurried, and the soundtrack supports rather than competes with it.
A common trap
Asking for a famous singer’s voice or assuming generated lyrics are accurate creates avoidable problems.
Saved in this browser only. Download your notes from the course menu to keep a copy.
Select a podcast moment that remains fair and understandable outside the full conversation.
A good podcast clip is a small complete thought. It gives enough context, makes a point and reaches a payoff. Starting on an exciting phrase can fail if the phrase depends on a question the viewer never heard.
Use the original podcast script in the resource kit or a conversation you have permission to edit. Listen for the claim and the qualification. Our example says that a simple filming routine helps consistency, while acknowledging that some projects need more preparation. Keep that qualification if removing it would change the advice.
In a two-person recording, frame the relevant speaker without cutting away so quickly that reactions become distracting. Captions should identify the words, while a short opening title can state the topic. Avoid generated reaction shots presented as real responses. A pause, a nod or a slight hold can carry useful meaning.
SEE IT IN VIDMOAT · INTERACTIVE WALKTHROUGH
Work one panel at a time on your phone
Real editor screenshots · September 2026 · Select a step, then tap the image to zoom.
Phone browser view · 1 / 3
Bring in the source
Use Media in the bottom navigation to open the library. Upload the practice image, then add it to the timeline.
Look for this
Switch panels when the preview or controls need more space.
Phone browser view · 2 / 3
Inspect the selected clip
Select the clip, then use Properties to reach the inspector. The controls shown depend on what you selected.
Look for this
If the wrong properties appear, check the selected clip before changing anything.
Phone browser view · 3 / 3
Return to the picture
Close the panel to check the preview. Use the clip actions below the preview for trim and split tasks.
Look for this
Make small edits, then review with the controls out of the way.
Step 1 of 3
Follow along in Vidmoat
Find a 30 to 45 second segment containing one complete point.
Retain the question or add a truthful short context title when needed.
Trim repetition while preserving qualifications and natural turns.
Frame the active speaker and add corrected captions.
Watch as if you have never heard the original episode.
A prompt you can adapt
Make a standalone podcast clip about keeping a simple filming routine. Preserve the speaker’s qualification about projects that need preparation. Keep enough context to understand the advice, caption the actual words and avoid invented reactions.
Your turn
Record both parts of the supplied conversation yourself or with a consenting partner. Make a 30 to 45 second edit and ask a new viewer what advice they understood.
What a successful attempt looks like
The viewer can summarise the point, and the speaker would recognise the meaning of their original answer.
A common trap
Removing every qualifier can make a thoughtful opinion look like an absolute claim.
Saved in this browser only. Download your notes from the course menu to keep a copy.
Show a task in the order a beginner needs and hold important actions long enough.
A tutorial succeeds when someone can do the task after watching. It may need a slower pace than a social montage. Start by showing the finished result, then explain the small number of steps needed to reach it.
For the small-business project, film how to wrap a notebook as a simple gift. This avoids private customer information and lets you demonstrate a practical process with ordinary objects. Show the paper, the fold and the final presentation. Keep the action in frame; your face is optional when the hands teach the task.
Use numbered step titles and narration that matches the current action. Do not cut from a half-completed fold directly to the finished object if that missing movement is what the learner needs. A small zoom can clarify a detail, but a sudden transition can hide it. Replay the tutorial with the question “Could I copy this without guessing?”
SEE IT IN VIDMOAT · INTERACTIVE WALKTHROUGH
Give a title room to breathe
Real editor screenshots · September 2026 · Select a step, then tap the image to zoom.
Actual editor capture; cropped where useful · 1 / 3
Write the message
Add a Clean Title from Text, select its timeline clip, and open Style. Replace the content with Small desk. Big difference. This is an emphasis title, not a transcript.
Look for this
Content changes the words; font, size and fill change their treatment.
Actual editor capture; cropped where useful · 2 / 3
Notice the collision
This first attempt places the title over the lamp. The words compete with the detail we want people to see. Pause before adding more decoration.
Look for this
Ask what should get attention first: the product or the words?
Actual editor capture; cropped where useful · 3 / 3
Move into open space
Drag the selected title upward in the preview. The real captured edit clears the lamp. Next, improve size and contrast for your own footage and watch the whole shot.
Look for this
Compare the two frames. Moving a title can solve more than adding an effect.
Step 1 of 3
Follow along in Vidmoat
Film the finished object and three clear steps from a stable position.
Arrange a quick result preview followed by the steps in order.
Remove waiting time, but keep the essential hand movements.
Add short numbered titles and captions for any spoken instructions.
End on the finished object and one honest next step, such as trying it with a different paper.
A prompt you can adapt
Make a 45-second beginner tutorial from my notebook-wrapping footage. Show the finished result first, then three numbered steps. Keep the hand movements needed to follow each fold. Use simple text and hold the final result for a moment.
Your turn
Give your edit to someone who has not seen the recording. Ask them to describe or repeat the steps. Note the first place they need clarification and revise it.
What a successful attempt looks like
The task can be followed in order, with no essential action hidden by a cut or title.
A common trap
Fast editing is not automatically helpful teaching. A missing step costs the viewer more time than a slightly longer shot.
Saved in this browser only. Download your notes from the course menu to keep a copy.
Create a beginning, change and payoff using images, footage or optional generated shots.
A story needs a change. Three attractive images become more interesting when the first establishes a situation, the second changes it and the third shows the result. Our fictional robot begins at a dim desk, discovers a lamp and ends in a warmer working space.
You can tell this story with the included stills and reframing, with your own filmed object, or with optional generated shots. The core assignment does not depend on generation. Plan the sequence first so you know what each shot contributes.
Sound can make the change clearer. Start quietly, introduce a small sound when the lamp turns on, and let the ending breathe. If you add a switch sound that was not in the recording, treat it as designed sound rather than claiming it was captured live. Keep on-screen words sparse; a visual story can often work with only an opening or ending line.
SEE IT IN VIDMOAT · INTERACTIVE WALKTHROUGH
Work one panel at a time on your phone
Real editor screenshots · September 2026 · Select a step, then tap the image to zoom.
Phone browser view · 1 / 3
Bring in the source
Use Media in the bottom navigation to open the library. Upload the practice image, then add it to the timeline.
Look for this
Switch panels when the preview or controls need more space.
Phone browser view · 2 / 3
Inspect the selected clip
Select the clip, then use Properties to reach the inspector. The controls shown depend on what you selected.
Look for this
If the wrong properties appear, check the selected clip before changing anything.
Phone browser view · 3 / 3
Return to the picture
Close the panel to check the preview. Use the clip actions below the preview for trim and split tasks.
Look for this
Make small edits, then review with the controls out of the way.
Step 1 of 3
Follow along in Vidmoat
Write the situation, change and result in one sentence each.
Choose three to five shots from your own material or the original course illustrations.
Build a 20 to 30 second sequence with a clear turning point.
Use one deliberate sound or music change at that turning point.
Check character or object continuity and show the ending long enough to register.
A prompt you can adapt
Build a 30-second fictional desk story: a quiet desk, discovery of the lamp, then a warm place to work. Use my supplied assets, one restrained musical change and minimal text. Keep the same robot only if it appears in more than one shot.
Your turn
Create two endings: a quick cut to black and a two-second hold on the result. Ask which ending makes the change clearer.
What a successful attempt looks like
A viewer can say what changed between the first and final shots, even with no narration.
A common trap
A montage of unrelated attractive shots may have atmosphere but no understandable change.
Saved in this browser only. Download your notes from the course menu to keep a copy.
Distinguish frame shape, resolution and quality, then verify a finished file.
Aspect ratio describes the shape of the frame. Resolution describes its pixel dimensions. Quality settings affect how the result is encoded. These are related but different decisions. A high-quality setting does not automatically change a vertical project into a landscape one or recover lost source detail.
Use Project Settings for the intended frame shape and check the actual dimensions displayed in Export. For a vertical HD delivery, 1080 by 1920 is a useful target when your account and sources support it. A landscape HD delivery is 1920 by 1080. Free or limited accounts may export at a lower resolution and include Vidmoat branding. Use the available output for learning rather than treating an upgrade as a course requirement.
Start with a draft to check the edit cheaply and quickly. For delivery, MP4 is a practical option when offered. Use a frame rate that suits the source and destination; changing 30 fps footage to 60 fps does not create genuine captured motion. Watch the downloaded file all the way through. The timeline preview is not the final delivery check.
SEE IT IN VIDMOAT · INTERACTIVE WALKTHROUGH
Choose an export you can check
Real editor screenshots · September 2026 · Select a step, then tap the image to zoom.
Actual editor capture; cropped where useful · 1 / 3
Choose the destination
Open Export. This vertical practice project is 1080 × 1920. Choose where it is going, or use Quick check for an early review. No export job was started for these screenshots.
Look for this
The destination preset is a starting point. Read the summary before you render.
Actual editor capture; cropped where useful · 2 / 3
Read the actual settings
Expand Advanced settings. Inspect format, resolution, frame rate and quality. A larger output cannot restore detail that was never in the source. Options depend on the current project and plan.
Look for this
Here the source is vertical, so Full is 1080 × 1920. This is not evidence of a 4K export.
Phone browser view · 3 / 3
Review on a small screen
The phone browser presents the same export task in a narrower view. Scroll within the settings if necessary, and read the final resolution before starting.
Look for this
After a real export, open the resulting file and check picture, sound, captions and ending.
Step 1 of 3
Follow along in Vidmoat
Confirm the intended shape in Project Settings.
Open Export and read the actual output dimensions and any plan restriction.
Choose MP4 and suitable frame rate and quality settings where available.
Render one draft, review it, then produce the required final version.
Download and play the final file, checking the start, joins, captions, sound and ending.
A prompt you can adapt
Prepare an MP4 for vertical phone viewing. Check the current canvas and permitted output dimensions, preserve the intended frame rate, and tell me about any branding or resolution limit before rendering. Do not start duplicate render jobs.
Your turn
Export your ten-second sequence first. Inspect the file dimensions and play it outside Vidmoat. Record the settings and one thing you checked.
What a successful attempt looks like
The actual file opens, has the expected shape and permitted dimensions, and plays correctly to the end.
A common trap
A successful render status does not prove the captions are readable or the final word is intact.
Saved in this browser only. Download your notes from the course menu to keep a copy.
Separate upload, preview, agent and render failures and take a focused next step.
“It is not working” can describe several different stages. An upload failure means the source may not be available. A preview failure may happen even when the source exists. An agent failure can leave a valid project unchanged. A render failure concerns producing the output file. Repeating the same prompt across all four does not diagnose any of them.
Start with the smallest check. Does the file appear in the library and finish uploading? Does a single clip play? Did the agent actually change the timeline? Does the export have a job reference or a specific error? Record the stage and the message before retrying.
On a phone, keep the app active while finishing an upload and check network stability. For an incompatible source, a compatible copy such as H.264 video with AAC audio in an MP4 container can be a useful troubleshooting option; keep the original. A retry should address a likely cause. Several simultaneous exports can add queue pressure without fixing the problem.
SEE IT IN VIDMOAT · INTERACTIVE WALKTHROUGH
Choose an export you can check
Real editor screenshots · September 2026 · Select a step, then tap the image to zoom.
Actual editor capture; cropped where useful · 1 / 3
Choose the destination
Open Export. This vertical practice project is 1080 × 1920. Choose where it is going, or use Quick check for an early review. No export job was started for these screenshots.
Look for this
The destination preset is a starting point. Read the summary before you render.
Actual editor capture; cropped where useful · 2 / 3
Read the actual settings
Expand Advanced settings. Inspect format, resolution, frame rate and quality. A larger output cannot restore detail that was never in the source. Options depend on the current project and plan.
Look for this
Here the source is vertical, so Full is 1080 × 1920. This is not evidence of a 4K export.
Phone browser view · 3 / 3
Review on a small screen
The phone browser presents the same export task in a narrower view. Scroll within the settings if necessary, and read the final resolution before starting.
Look for this
After a real export, open the resulting file and check picture, sound, captions and ending.
Step 1 of 3
Follow along in Vidmoat
Name the failed stage: upload, preview, agent action or export.
Check the source upload and saved state before closing anything.
Test a short single-clip sequence to isolate the issue.
Use the visible Retry or recovery action once after addressing the cause.
If it persists, use Get help with the project, failed stage, time and error or job reference.
A prompt you can adapt
Diagnose this project before editing again. Check whether the source upload completed, whether the selected clip is available, whether the last agent run applied changes, and whether an export job already exists. Report the failing stage and the next useful step.
Your turn
Use the troubleshooting worksheet to describe a hypothetical case where the preview is black but the file is in the library. List two checks before deleting anything.
What a successful attempt looks like
You investigate clip placement, source availability and decode or preview errors, while preserving the original file and project.
A common trap
Deleting a project to fix one failed preview can destroy useful work without addressing the source problem.
Saved in this browser only. Download your notes from the course menu to keep a copy.
Perform a structured quality check and prepare the correct delivery.
The final review is where separate choices become one experience. Watch the file at normal speed without stopping. Write down the moments that distract you, then return to them. Constantly pausing during the first pass can hide pacing problems.
Use three passes. First, story: does the opening make sense and does the ending answer it? Second, picture and text: are important details visible, words correct and layouts readable? Third, sound: is the voice clear, are levels comfortable and does the ending finish cleanly? A final phone viewing catches problems that a large screen can disguise.
Save the file with a name that identifies the project, shape and revision. Keep the source project and a note of the settings. A share link and a downloaded file are different deliveries. Sharing publicly is a separate decision; check permissions and the destination before posting. For the course, a private file is enough.
SEE IT IN VIDMOAT · INTERACTIVE WALKTHROUGH
Choose an export you can check
Real editor screenshots · September 2026 · Select a step, then tap the image to zoom.
Actual editor capture; cropped where useful · 1 / 3
Choose the destination
Open Export. This vertical practice project is 1080 × 1920. Choose where it is going, or use Quick check for an early review. No export job was started for these screenshots.
Look for this
The destination preset is a starting point. Read the summary before you render.
Actual editor capture; cropped where useful · 2 / 3
Read the actual settings
Expand Advanced settings. Inspect format, resolution, frame rate and quality. A larger output cannot restore detail that was never in the source. Options depend on the current project and plan.
Look for this
Here the source is vertical, so Full is 1080 × 1920. This is not evidence of a 4K export.
Phone browser view · 3 / 3
Review on a small screen
The phone browser presents the same export task in a narrower view. Scroll within the settings if necessary, and read the final resolution before starting.
Look for this
After a real export, open the resulting file and check picture, sound, captions and ending.
Step 1 of 3
Follow along in Vidmoat
Watch the downloaded file once without pausing and record distractions.
Check the hook, evidence, qualification and verdict.
Inspect captions, cropped details, blank frames and the final frame.
Listen to quiet words, music fades and transitions at comfortable volume.
Name the accepted file, save the settings and keep a copy with your project notes.
A prompt you can adapt
Review the saved edit for story clarity, text readability, framing and possible audio issues. Name any limitations of your review. I will also play the downloaded file myself before delivery.
Your turn
Review the tech project with the capstone rubric. Find at least one improvement, make it, and compare the final file with the previous version.
What a successful attempt looks like
The delivered file is the reviewed revision, not an earlier export with the same vague name.
A common trap
An AI review of sampled frames cannot prove continuous playback or the sound of the final mix.
Saved in this browser only. Download your notes from the course menu to keep a copy.
Complete a short video using the course workflow with less step-by-step help.
Your capstone is a chance to make decisions yourself. Choose a review, a podcast clip, a tutorial or a short visual story. A thirty to sixty second result is enough if it has a clear purpose and careful execution. Length is not evidence of skill.
Begin with a fresh brief and your own material or the original course assets. Plan the story before asking the agent to act. Save the first rough cut as a reference in your notes, then improve structure, captions, sound and picture in separate passes. You may use generation if it helps, but it earns no extra marks simply for being present.
The submission contains the final video, your brief and a short decision log. Explain two changes you made after reviewing the first pass and one AI result you checked manually. If you use the lamp illustrations, describe the piece as a concept demonstration. If your plan adds branding or limits resolution, state that; the rubric assesses your editing within the tools available.
SEE IT IN VIDMOAT · INTERACTIVE WALKTHROUGH
Choose an export you can check
Real editor screenshots · September 2026 · Select a step, then tap the image to zoom.
Actual editor capture; cropped where useful · 1 / 3
Choose the destination
Open Export. This vertical practice project is 1080 × 1920. Choose where it is going, or use Quick check for an early review. No export job was started for these screenshots.
Look for this
The destination preset is a starting point. Read the summary before you render.
Actual editor capture; cropped where useful · 2 / 3
Read the actual settings
Expand Advanced settings. Inspect format, resolution, frame rate and quality. A larger output cannot restore detail that was never in the source. Options depend on the current project and plan.
Look for this
Here the source is vertical, so Full is 1080 × 1920. This is not evidence of a 4K export.
Phone browser view · 3 / 3
Review on a small screen
The phone browser presents the same export task in a narrower view. Scroll within the settings if necessary, and read the final resolution before starting.
Look for this
After a real export, open the resulting file and check picture, sound, captions and ending.
Step 1 of 3
Follow along in Vidmoat
Choose a project lane and complete the one-page brief.
Prepare sources, permissions and a short shot or scene list.
Build a rough cut, then revise structure before finishing details.
Export, review on a phone and score the result with the rubric.
Submit the video, brief, settings and decision log to your reviewer or your own portfolio folder.
A prompt you can adapt
Help me execute this capstone brief in stages. Start by checking the sources and proposing a rough structure. Keep the audience and non-negotiables visible. Pause after the rough cut so I can review before captions, sound and polish.
Your turn
Complete one 30 to 60 second capstone. Budget 60 to 90 minutes for editing and review, plus filming time if you need it.
What a successful attempt looks like
The submission has a clear viewer, a supported message, a complete ending and evidence of at least two purposeful revisions.
A common trap
Copying every instruction from a showcase without adapting it to your own source does not demonstrate judgement.
Saved in this browser only. Download your notes from the course menu to keep a copy.
Evaluate a video against criteria and turn observations into revisions.
Useful feedback describes an effect on the viewer and points to a place in the edit. “At twelve seconds I could not read the second line before it disappeared” gives the editor something to fix. “I dislike that font” may be a preference, but it needs a connection to the brief to become useful guidance.
Review the video before reading the creator’s explanation. Write what you think it is trying to communicate. Then compare your interpretation with the brief. A mismatch may reveal an unclear opening, missing evidence or an ending that introduces a new idea too late.
Use the rubric consistently and separate required fixes from optional tastes. A missing negative word in a caption is an accuracy problem. Choosing a slightly warmer orange may be a preference. Give the creator room to solve the problem instead of prescribing every click. If you are studying alone, leave the edit for a while and return as a new viewer.
SEE IT IN VIDMOAT · INTERACTIVE WALKTHROUGH
Choose an export you can check
Real editor screenshots · September 2026 · Select a step, then tap the image to zoom.
Actual editor capture; cropped where useful · 1 / 3
Choose the destination
Open Export. This vertical practice project is 1080 × 1920. Choose where it is going, or use Quick check for an early review. No export job was started for these screenshots.
Look for this
The destination preset is a starting point. Read the summary before you render.
Actual editor capture; cropped where useful · 2 / 3
Read the actual settings
Expand Advanced settings. Inspect format, resolution, frame rate and quality. A larger output cannot restore detail that was never in the source. Options depend on the current project and plan.
Look for this
Here the source is vertical, so Full is 1080 × 1920. This is not evidence of a 4K export.
Phone browser view · 3 / 3
Review on a small screen
The phone browser presents the same export task in a narrower view. Scroll within the settings if necessary, and read the final resolution before starting.
Look for this
After a real export, open the resulting file and check picture, sound, captions and ending.
Step 1 of 3
Follow along in Vidmoat
Watch once and write the message you understood.
Read the brief and score each rubric category using visible evidence.
Name one strength that should be preserved.
Give two timestamped fixes and explain their effect on understanding.
Have the creator revise and resubmit the affected sections.
A prompt you can adapt
Assess this edit against my brief. Give one strength and two specific improvements with timeline times. Separate factual or readability problems from personal taste. State what you could inspect and what needs human playback.
Your turn
Exchange projects with a peer, or review your own after a break. Use the format “At [time], I noticed [issue], which made [effect]. Try [direction].”
What a successful attempt looks like
The editor can act on the feedback, and your score is supported by something observable in the video.
A common trap
A numerical score without evidence does not explain how to improve.
Saved in this browser only. Download your notes from the course menu to keep a copy.
Build a reusable brief, review checklist and learning plan.
Finishing one video gives you a process you can repeat. Keep the parts that worked: a brief template, a small caption system, an export checklist and a folder of source files you are entitled to reuse. Keep prompts as starting points, not as commands that must fit every genre.
After publishing, look for evidence that matches the purpose of the video. A tutorial might be judged by whether people complete the task; a review by whether viewers understand the trade-off; a business clip by qualified enquiries. Views alone cannot tell you all of that. Use the analytics available on the destination and direct feedback, while remembering that a tiny sample can mislead.
Change one important thing at a time when comparing versions. A stronger opening, shorter explanation or clearer title is a useful experiment. Replacing the audience, soundtrack, length and format together makes it difficult to know why the result changed. Your next goal is three finished videos with deliberate improvements, not one endlessly polished draft.
SEE IT IN VIDMOAT · INTERACTIVE WALKTHROUGH
Choose an export you can check
Real editor screenshots · September 2026 · Select a step, then tap the image to zoom.
Actual editor capture; cropped where useful · 1 / 3
Choose the destination
Open Export. This vertical practice project is 1080 × 1920. Choose where it is going, or use Quick check for an early review. No export job was started for these screenshots.
Look for this
The destination preset is a starting point. Read the summary before you render.
Actual editor capture; cropped where useful · 2 / 3
Read the actual settings
Expand Advanced settings. Inspect format, resolution, frame rate and quality. A larger output cannot restore detail that was never in the source. Options depend on the current project and plan.
Look for this
Here the source is vertical, so Full is 1080 × 1920. This is not evidence of a 4K export.
Phone browser view · 3 / 3
Review on a small screen
The phone browser presents the same export task in a narrower view. Scroll within the settings if necessary, and read the final resolution before starting.
Look for this
After a real export, open the resulting file and check picture, sound, captions and ending.
Step 1 of 3
Follow along in Vidmoat
Save your brief, prompt and final review checklist in one reusable folder.
Write a simple style note covering captions, titles, colour and sound.
Choose one meaningful outcome for the next video.
Plan three small videos with one improvement to test in each.
Keep a short log of source, decision, result and next change.
A prompt you can adapt
Turn the decisions that worked in this project into a reusable editing brief and review checklist. Keep them adaptable to other sources. Separate my style preferences from the facts that must be checked for each new video.
Your turn
Plan your next three videos. For each, name a viewer, a question, a source you already have and one skill to improve.
What a successful attempt looks like
You leave with a repeatable workflow: brief, prepare, rough cut, review, polish, export and learn.
A common trap
A template should reduce repetitive setup, not force every story into the same pace or layout.
Saved in this browser only. Download your notes from the course menu to keep a copy.
Help someone decide whether an everyday object fits their needs. Use the lamp script with your actual object, or label the supplied illustration version as a concept demonstration.
Prepare your sources
One 45 to 60 second speaking take, recorded from the original script below.
Three close-ups: the object on the desk, the useful detail, and the limitation.
Optional practice-bed.wav. Use your own licensed alternative if it fits better.
Original recording script or story
This little lamp has stayed on my desk for one simple reason: it puts light where I need it. I can move the shade towards my notebook, and the base leaves room for my keyboard. The trade-off is that it lights a small area. If you want to brighten a whole room, this is not the job for it. For notes at a small desk, I like this kind of focused light.
BEFORE
A raw recording includes sitting down, a repeated opening, a demonstration and walking away. The viewer waits for the point; the lamp detail may be too small to see.
AFTER
Open on the useful reason, show the matching detail, retain the limitation and finish with a clear personal verdict. Captions carry the words; three emphasis phrases organise the ideas.
Target timeline map
Time
Story job
Picture
Editing decision
00:00–00:03
Hook
Object or speaker
Start on a complete useful phrase; no setup.
00:03–00:10
Benefit
Lamp detail over narration
Show the shade or switch as it is discussed.
00:10–00:18
Evidence
Desk-wide shot
Show the footprint, with a brief Small desk title.
00:18–00:25
Limitation
Wider lighting view
Keep the qualification about a small lit area.
00:25–00:30
Verdict
Speaker or clean object shot
End on the personal use case and let the sound finish.
These are target story allocations. Set the exact edit boundaries from your own recording.
Build the project
Record the script naturally and only keep claims that match your real object. Change the script if your lamp does not move or its base is large. Leave setup at the start so you can practise removing it.
Import the main take and close-ups. Ask the agent for a source inventory, then request a rough cut around the benefit, limitation and verdict.
Watch the rough cut without music. Check that no word was clipped and that the qualification survived. If it runs long, remove repetition rather than accelerating the whole voice.
Place close-ups over the relevant words and mute unnecessary camera audio on those inserts. Add corrected captions after the main cuts settle.
Use one large emphasis title at a time: Focused light, Small desk, Small area. Keep the last phrase visibly honest rather than hiding it in tiny text.
Add a quiet music bed if it improves the result. Try one gentle push-in on the detail, then compare with no move. Export and run the three-pass review.
Starting prompt
Make a 30-second review from my real footage. Remove the recording setup and walk-away ending. Keep the focused-light benefit, show the desk footprint and preserve the small-area limitation. Use the supplied close-ups with continuous narration. Start with the rough cut only.
Review your result
Pass when the viewer can name both the benefit and limitation, the product stays visible, and the voice is clear. Do not deduct marks for plan branding or a permitted lower-resolution export.
Try another version
Make a second opening using only the close-up for the first two seconds. Keep the rest comparable and ask a viewer which opening sets a clearer expectation.
Extract a useful idea without making a speaker sound more certain than they were.
Prepare your sources
Two short speaking parts recorded by you or consenting participants.
A stable wide frame or separate speaker shots.
Optional simple title card; music is not required.
Original recording script or story
HOST: What helped you stop putting off filming? GUEST: I stopped planning a different setup every time. I keep one small space ready and write the three points I want to explain. That makes it easier to start. It does not mean every video should be improvised. A product demonstration or a sensitive interview still needs preparation. But for a quick update, a repeatable routine helps me actually finish. HOST: So the routine removes the setup, not the thinking? GUEST: Exactly. I still choose what is worth saying.
BEFORE
A promising quote sits inside a longer exchange. A very aggressive cut removes the qualification and makes the advice sound like all preparation is unnecessary.
AFTER
The clip retains enough question or title context, the practical routine, the qualification and the memorable final distinction.
Target timeline map
Time
Story job
Picture
Editing decision
00:00–00:04
Context
Question or topic title
Explain what problem is being answered.
00:04–00:15
Useful idea
Guest
Keep the ready space and three points.
00:15–00:29
Qualification
Guest or honest reaction
Retain the need for preparation on some projects.
00:29–00:40
Payoff
Question then answer
Routine removes setup, not thinking.
These are target story allocations. Set the exact edit boundaries from your own recording.
Build the project
Read the conversation aloud. Record it naturally, including the qualification. If recording both voices yourself, use a simple visual change to make the roles clear.
Import the footage and listen to the entire exchange. Write the point in one sentence before choosing the clip boundaries.
Cut repeated setup but preserve the connection between the advice and its limits. If you omit the host question, use a truthful title such as A simpler filming routine.
Reframe each speaker so the active person is clear. Avoid rapid swaps on every short interjection. Keep reactions only when they are real and useful.
Generate and correct captions. Read the advice again from the captions alone. Verify that the limitation remains just as clear as the main claim.
Export and ask someone who has not read the script what the speaker recommends. Compare their answer with the original meaning.
Starting prompt
Create a standalone podcast clip from this exchange. Keep the practical routine and the qualification that some projects need preparation. Preserve the final distinction between setup and thinking. Correct the captions against the audio and do not add fabricated reactions.
Review your result
Pass when a new viewer understands the advice and its limits. Reject a version that makes the guest say preparation is unnecessary.
Try another version
Produce a version with the question included and a version with a concise context title. Explain which one works better within the same time budget.
Teach a simple practical task clearly enough that a viewer can repeat it.
Prepare your sources
A notebook, suitable paper and a small piece of tape or a reusable ribbon.
Four recordings: finished result, placing the notebook, wrapping and folding, final securing.
Your own spoken instructions or the original narration below.
Original recording script or story
Here is a simple way to wrap a notebook. First, place it face down in the middle of your paper and check that both sides overlap. Fold the long sides over the notebook and secure the join. Then fold one short end into neat flaps and repeat at the other end. Finish with a ribbon or a small piece of tape. Check that the notebook can sit flat, and your gift is ready.
BEFORE
The camera runs while paper is moved around and the presenter searches for tape. One important fold is partly hidden by a hand and needs a clearer angle.
AFTER
A brief result preview leads into three numbered steps. Waiting time is cut, the important folds remain visible and the ending shows the finished object.
Target timeline map
Time
Story job
Picture
Editing decision
00:00–00:04
Result preview
Finished notebook
Show why the tutorial is useful.
00:04–00:14
Step 1
Top-down placing shot
Show the overlap check.
00:14–00:28
Step 2
Hands folding
Keep the essential movements; use a detail shot if needed.
00:28–00:38
Step 3
Securing and tidying
Show the final action clearly.
00:38–00:45
Result and invitation
Finished object
Hold the result; suggest trying a different paper.
These are target story allocations. Set the exact edit boundaries from your own recording.
Build the project
Record from a stable angle with your hands and the whole object visible. Avoid showing private order details or customer information.
Film the finished result separately, then the steps. If a hand blocks a fold, record a close-up rather than asking the edit to recover an unseen action.
Build the sequence using the result preview and three steps. Remove searching and waiting. Do not remove a movement that someone needs to copy.
Add short numbered titles: Position, Fold, Finish. Place them in open space and keep them consistent across the steps.
Match narration to the action. If the action takes longer, shorten the wording or give the shot more time rather than racing through it.
Ask someone to follow the finished edit. Revise the first unclear step and re-export the reviewed version.
Starting prompt
Make a 45-second tutorial from these notebook-wrapping shots. Show the result first, then Position, Fold and Finish. Cut waiting time while preserving the essential hand movements. Use readable numbered titles and keep the instructions aligned with the picture.
Review your result
Pass when a beginner can describe the sequence and identify each essential movement. The result should be achievable with the materials shown.
Try another version
Create a 15-second teaser that shows the result and one useful detail. Keep the complete 45-second tutorial as the teaching version.
Tell a simple visual change with stills or optional generated shots and one recurring subject.
Prepare your sources
Original lamp-wide.png, lamp-detail.png, lamp-desk.png and robot-reference.png.
Optional practice-bed.wav and your own permitted sound effect.
Optional generated shots using the robot reference; still images are sufficient.
Original recording script or story
No narration is required. The story is: a quiet desk feels unfinished, a small robot notices the lamp, and the desk becomes a welcoming place to work. Optional ending text: A little light changes the evening.
BEFORE
The assets are separate pictures with no order, sound relationship or reason to move between them.
AFTER
The opening establishes the space, the middle points attention towards the lamp, and the final hold makes the warmer result clear.
Target timeline map
Time
Story job
Picture
Editing decision
00:00–00:06
Situation
Wide desk
Let the viewer understand the space.
00:06–00:12
Attention
Robot or reframed reference
Direct attention towards the lamp.
00:12–00:18
Change
Lamp detail
Use the light change as the turning point.
00:18–00:26
Result
Warm desk
Let the music open slightly without overpowering.
00:26–00:30
Ending
Held result and optional text
Give the final idea time to settle.
These are target story allocations. Set the exact edit boundaries from your own recording.
Build the project
Choose the still-image route or optional generation route before starting. The still route can use framing and a few simple cuts to tell the same change.
Create the three-sentence story plan. Label any generated or illustrated version as fictional rather than presenting it as a filmed review.
For generated shots, reuse the same robot reference and fixed features. Compare the results for face, colour, proportions and antenna continuity.
Arrange the story with one clear turning point. Add a restrained move towards the lamp only if it helps direct attention.
Use the music bed quietly and shape the sound around the turning point. A designed switch sound is optional; do not pretend it came from the source.
Watch without text, then add only what is needed. Hold the final frame long enough for the viewer to understand the change.
Starting prompt
Make a 30-second fictional story using these original desk illustrations. Establish the quiet space, direct attention to the lamp and finish on a warmer desk. Use simple cuts, one purposeful move and minimal text. Do not generate new assets unless I ask.
Review your result
Pass when a viewer can describe the change and the same subject stays recognisable wherever it appears. Beautiful but unrelated shots do not meet the story goal.
Try another version
Make a calm and a more playful version by changing only the sound treatment and shot holds. Explain how those choices alter the feeling.
Submit a 30 to 60 second video, your brief, the export settings and a decision log. Score each category from 0 to 4 and multiply by its weight divided by 4.
Criterion
Weight
Evidence
Story and audience
20
The viewer and question are clear; the sequence reaches a useful ending.
Meaning and evidence
20
Claims, quotations and demonstrations remain accurate.
Pacing and continuity
15
Cuts preserve natural speech and essential action.
Text and accessibility
15
Captions and titles are correct and readable on a phone.
Sound
15
Voice and supporting sound are comfortable and intentional.
Picture and delivery
15
Framing, colour and the final file support the brief.
Four means strong; three mostly strong; two developing; one major work needed; zero missing or unusable. Suggested completion: 70 points, every category above zero, and no unresolved misleading claim, privacy issue or essential speech/caption error. Your account’s branding and permitted resolution limits do not reduce the score.
Story and audience
Strong: Clear purpose, supporting structure and a complete payoff.
Developing: Purpose exists but one section is confusing or redundant.
Needs revision: The viewer cannot identify the message or the ending does not answer it.
Meaning and evidence
Strong: Claims are supported; qualifications and important words survive.
Developing: Minor ambiguity needs correction without changing the whole story.
Needs revision: A misleading cut, false claim or incorrect critical caption changes the meaning.
Pacing and continuity
Strong: Clean joins, purposeful holds and no unintended gaps.
Developing: Some rushed or slow moments, but the sequence remains followable.
Needs revision: Missing action, clipped words or gaps prevent understanding.
Text and accessibility
Strong: Clear hierarchy, comfortable reading time and useful contrast.
Developing: A few crowded or brief captions need revision.
Needs revision: Essential text is missing, unreadable or covers the demonstration.
Sound
Strong: Clear speech, controlled music and smooth starts and endings.
Developing: Occasional imbalance, but words are understandable.
Needs revision: Important speech is buried, distorted or cut off.
Picture and delivery
Strong: Important detail stays visible and the reviewed file plays correctly.
Developing: Minor framing or delivery issues need a final fix.
Needs revision: The wrong revision, failed playback or lost essential detail prevents use.
A worked scoring example
Here is an illustrative scoring example, not a result from a real student. A creator submits a 35-second notebook-wrapping tutorial. The opening shows the result, the steps are in the right order and the final file plays correctly. The second step is a little rushed, two captions are crowded and the music briefly rises above a quiet word. No claim or instruction is misleading.
The reviewer gives story 3 out of 4, meaning 4, pacing 3, text 2, sound 3 and delivery 4. The weighted scores are 15, 20, 11.25, 7.5, 11.25 and 15, for a total of 80. The work meets the suggested score threshold, but the reviewer still identifies useful revisions. A passing score means the learner demonstrated the core skill; it does not mean every detail is perfect.
Useful feedback would say: “At 00:16, the fold happens before I can see where the corner goes. Hold the close-up a little longer. At 00:22, split the two-line caption into shorter phrases. Keep the result preview because it makes the task clear.” The creator can then fix those moments without rebuilding the whole edit.
Now change the scenario: imagine the caption drops a crucial negative word and reverses a safety instruction. That is an essential accuracy problem, so the work needs correction even if the total score elsewhere is high. Do not average away an error that changes what the viewer is being told.
For your own review, write the evidence before the score. Record the exact exported revision you watched, then list one strength to preserve and two timestamped improvements. After revision, check the affected moments and the whole final file again. If you disagree with a peer's preference, return to the brief and the viewer's needs. The purpose of assessment is to improve the work, not to make every creator choose the same style.
Self-assessment and local progress are learning tools, not an externally accredited qualification. Use the workbook to record a human review and any resubmission.
KEEP THIS NEARBY
Editing glossary
Aspect ratio
The shape of a frame, written as width to height, such as 9:16.
Asset
A source item such as a video, image, audio recording or generated file.
B-roll
Supporting pictures shown alongside the main story or narration.
Caption
On-screen text representing speech or relevant audio information.
Clip
A timeline item that uses all or part of a source asset.
Colour correction
Adjusting a shot to improve balance, detail and consistency.
Crop
Removing outer parts of an image from the visible frame.
Cut
An immediate change from one shot to the next; also the act of dividing or removing material.
Ducking
Lowering a music or background track while speech is present.
Easing
Changing how a movement accelerates or slows between keyframes.
Export
Producing a playable output file from the edited project.
Frame rate
The number of frames displayed per second, commonly written as fps.
Hook
The opening reason for a viewer to keep watching.
Keyframe
A property value stored at a particular point in time.
Library
The place where available source media is listed.
Rough cut
An early sequence focused on structure before finishing details.
Source time
A location in the original recording before timeline edits.
Timeline time
A location in the edited sequence.
Track
A timeline layer holding video, images, text or audio.
Transcript
A text representation of spoken words, sometimes with timing.
Trim
Changing the beginning or ending of a clip.
Voiceover
Narration heard over pictures, whether recorded or generated.
Six guided screenshot demonstrations show the real controls and the reason behind each action. They are included inside the related lessons too.
SEE IT IN VIDMOAT · INTERACTIVE WALKTHROUGH
From a file to your first timeline clip
Real editor screenshots · September 2026 · Select a step, then tap the image to zoom.
Actual editor capture; cropped where useful · 1 / 3
Start in the Media library
Choose Upload / drop media and select the three lamp images from the practice pack. A source in the library is available to use; it is not yet part of the finished video.
Look for this
Find the upload area, then the three source cards.
Actual editor capture; cropped where useful · 2 / 3
Place a source on the timeline
Double-click lamp-wide.png in the library. In this captured example, it becomes a five-second clip on V1. Select the clip before changing its properties.
Look for this
Look for the outlined clip on V1. The ruler above it is time.
Actual editor capture; cropped where useful · 3 / 3
Read the whole workspace
The library is on the left, the picture in the middle, and the selected clip’s Motion controls on the right. The timeline below decides what appears and when.
Look for this
Select your own clip and check that the inspector follows your selection.
Step 1 of 3
SEE IT IN VIDMOAT · INTERACTIVE WALKTHROUGH
Give a title room to breathe
Real editor screenshots · September 2026 · Select a step, then tap the image to zoom.
Actual editor capture; cropped where useful · 1 / 3
Write the message
Add a Clean Title from Text, select its timeline clip, and open Style. Replace the content with Small desk. Big difference. This is an emphasis title, not a transcript.
Look for this
Content changes the words; font, size and fill change their treatment.
Actual editor capture; cropped where useful · 2 / 3
Notice the collision
This first attempt places the title over the lamp. The words compete with the detail we want people to see. Pause before adding more decoration.
Look for this
Ask what should get attention first: the product or the words?
Actual editor capture; cropped where useful · 3 / 3
Move into open space
Drag the selected title upward in the preview. The real captured edit clears the lamp. Next, improve size and contrast for your own footage and watch the whole shot.
Look for this
Compare the two frames. Moving a title can solve more than adding an effect.
Step 1 of 3
SEE IT IN VIDMOAT · INTERACTIVE WALKTHROUGH
Give the agent a useful reference
Real editor screenshots · September 2026 · Select a step, then tap the image to zoom.
Actual editor capture; cropped where useful · 1 / 3
Check the target of your request
Open Ask AI. A selected-clip chip scopes the request to that clip. Remove the chip when your brief applies to the whole edit. These screenshots show the composer before sending.
Look for this
The Clean Title chip in this capture means the title is selected.
Actual editor capture; cropped where useful · 2 / 3
Separate inspiration from footage
Choose + Style reference for inspiration. Use the regular upload path for material that belongs in the video. Explain what you want to borrow: text placement, pace, palette or mood.
Look for this
The captured UI accepts reference images or the first two minutes of a reference video. Check the current limit in your app.
Phone browser view · 3 / 3
Find the same task on a phone
In the phone browser, use AI in the bottom navigation to reach the chat. Open the relevant panel instead of trying to fit the entire desktop workspace on screen.
Look for this
This is the responsive web editor. Native app arrangements may differ.
Step 1 of 3
SEE IT IN VIDMOAT · INTERACTIVE WALKTHROUGH
Make a deliberate picture adjustment
Real editor screenshots · September 2026 · Select a step, then tap the image to zoom.
Actual editor capture; cropped where useful · 1 / 2
Select first, transform second
Select the image clip, then open Motion. Scale changes the size; X and Y change position. A diamond beside a property is a keyframe control.
Look for this
Start with a still composition that works. Then follow the lesson to animate it.
Actual editor capture; cropped where useful · 2 / 2
Adjust with a reason
Open Color for the selected clip. Inspect the real controls in this panel, change one thing at a time, and compare against the original. The lamp artwork is a teaching source, not a skin-tone grading test.
Look for this
Use your own representative footage for the colour exercise; do not copy arbitrary values from a screenshot.
Step 1 of 2
SEE IT IN VIDMOAT · INTERACTIVE WALKTHROUGH
Choose an export you can check
Real editor screenshots · September 2026 · Select a step, then tap the image to zoom.
Actual editor capture; cropped where useful · 1 / 3
Choose the destination
Open Export. This vertical practice project is 1080 × 1920. Choose where it is going, or use Quick check for an early review. No export job was started for these screenshots.
Look for this
The destination preset is a starting point. Read the summary before you render.
Actual editor capture; cropped where useful · 2 / 3
Read the actual settings
Expand Advanced settings. Inspect format, resolution, frame rate and quality. A larger output cannot restore detail that was never in the source. Options depend on the current project and plan.
Look for this
Here the source is vertical, so Full is 1080 × 1920. This is not evidence of a 4K export.
Phone browser view · 3 / 3
Review on a small screen
The phone browser presents the same export task in a narrower view. Scroll within the settings if necessary, and read the final resolution before starting.
Look for this
After a real export, open the resulting file and check picture, sound, captions and ending.
Step 1 of 3
SEE IT IN VIDMOAT · INTERACTIVE WALKTHROUGH
Work one panel at a time on your phone
Real editor screenshots · September 2026 · Select a step, then tap the image to zoom.
Phone browser view · 1 / 3
Bring in the source
Use Media in the bottom navigation to open the library. Upload the practice image, then add it to the timeline.
Look for this
Switch panels when the preview or controls need more space.
Phone browser view · 2 / 3
Inspect the selected clip
Select the clip, then use Properties to reach the inspector. The controls shown depend on what you selected.
Look for this
If the wrong properties appear, check the selected clip before changing anything.
Phone browser view · 3 / 3
Return to the picture
Close the panel to check the preview. Use the clip actions below the preview for trim and split tasks.
Look for this
Make small edits, then review with the controls out of the way.
Marketplace publication requires video and other quality criteria. This package is a complete text course and production kit; it does not contain recorded lectures.
Check current account entitlements, AI credits, branding and output limits before paid exercises.
Your data in this course
Progress, answers and notes stay in your current browser. No analytics are sent by this package. Clearing browser storage can erase that local record. The download below saves your record as JSON.
September 2026 edition. Complete text course; interactive screenshot demonstrations included; 59 minutes of AI-narrated video lessons included. The curriculum CSV is a mapping aid, not a SCORM package or a guaranteed platform import.
 vidmoat